
Pixel Eras
A true low-resolution retro look for URP and HDRP: pixel-perfect scaling, palettes and dithering, pixel outlines, CRT, VHS, composite video and handheld LCD screens, PS1/N64 materials and twenty eras you can switch or crossfade at runtime.
Quick start
From an ordinary URP or HDRP scene to a retro game in under a minute:
- Open Window → 4ssets → Retro Studio.
- Press Make it Retro. It sets up the pipeline (URP: the Pixel Eras renderer feature on your renderers; HDRP: its two shaders in Always Included Shaders), adds a Pixel Eras Camera to the Main Camera and sets the 16-bit Console era. One Undo reverts it.
- Pick another era in the Eras tab. Retro ON / OFF in the header compares before and after. To make it yours, press New style, name it, and tune every detail in the Look tab.
- For a picture whose pixels never shimmer, make the camera orthographic and turn on Smooth Pixel Camera (see Pixel stability).
- Optional: in Retro Studio's Assets tab press Convert scene materials (or select materials → Assets → 4ssets → Pixel Eras → Convert to Retro Shaders) for vertex wobble and affine textures, then check the Doctor tab for settings that fight the look.
Assets/4ssets/PixelEras/Demo/Demo.unity,
press Play and press Esc: every setting of the look can be changed live.Requirements
- Unity 6.0 LTS (6000.0.85f1) or newer.
- Universal Render Pipeline 17 or newer, with the Universal Renderer (Forward, Forward+, Deferred) or the 2D Renderer.
- Render Graph on every Unity 6 version. URP Compatibility Mode (Render Graph disabled) on Unity 6.0–6.3, where it exists. Unity 6.4 removed the mode, so Pixel Eras compiles its Compatibility code only on versions that have it.
- Or the High Definition Render Pipeline 17 or newer: see HDRP for what differs there.
- Demo only: Unity UI (
com.unity.ugui). It uses the Input System when installed and the Input Manager otherwise. - Built-in modules (Package Manager → Built-in): Animation, Particle System and UI, which every project has unless switched off. Physics and Terrain are optional: without Physics the Smooth Pixel Camera's automatic Focus Distance stays at 10 m, without Terrain the material converter skips terrains. The demo also needs Physics and Audio; without them it is left out of the compile instead of breaking the project.
- Enter Play Mode Options work with domain and scene reload switched off.
- Linear or Gamma colour space. Palettes and colour steps are matched in sRGB in both; only Unity's own lighting differs between them.
One package serves both pipelines: on import it detects which are installed and compiles only their code and shader passes, so nothing has to be removed or switched by hand.
Setup
Automatic
Window → 4ssets → Retro Studio → Make it Retro does the following:
- URP: adds the Pixel Eras renderer feature to every renderer of every URP asset in use (each quality level and the default);
- HDRP: adds the Uber and Present shaders to Project Settings → Graphics → Always Included Shaders, so player builds keep them;
- adds a Pixel Eras Camera to the Main Camera, or to any camera that renders to the screen when no camera is tagged MainCamera;
- sets the 16-bit Console era.
All of it is one Undo step. The Doctor tab then runs and lists anything left to fix.
Manual
- URP: select your Universal Renderer Data (or 2D Renderer Data) → Add Renderer Feature → Pixel Eras. Repeat for every renderer your quality levels use.
HDRP: add
Hidden/4ssets/PixelEras/UberandHidden/4ssets/PixelEras/Presentto Always Included Shaders. - Select the camera → Add Component → Pixel Eras → Pixel Eras Camera.
- Assign an era from
Pixel Eras/Eras/, or leave the era empty and add a Pixel Eras Look override to a Volume.
How it works
- The Pixel Eras Camera lowers the camera's render scale, so the scene itself renders at the game resolution — about 320×224 for the 16-bit Console era. Nothing renders at full resolution and is then shrunk, so a retro look usually costs less than none.
- The Uber pass runs at the game resolution, before post-processing: saturation and contrast, pixel edges, colour depth, dithering and the palette.
- The pipeline's own post-processing then runs on the retro picture, still at the game resolution: Chromatic Aberration, Bloom, Vignette, Film Grain or Lens Distortion land on the palette, the dithering and the edges like on any other image. See Post-processing.
- The Present pass scales the picture up to the screen (whole-number or Sharp Fill), with the sub-pixel shift of the Smooth Pixel Camera. Then it draws CRT and VHS at full resolution.
- Screen Space Overlay UI is drawn after Present, sharp and at full resolution.
That is URP. HDRP has no per-camera render scale, so there the scene renders at the screen's resolution and the Uber pass takes the game picture from it — see below.
Post-processing
Pixel Eras works together with the pipeline's post-processing and never turns any of it off. Its picture is made first; your Volume effects are applied on top of it.
- Effects on top of the pixels: Chromatic Aberration, Bloom, Vignette, Film Grain, Lens Distortion, Panini, Motion Blur and Depth of Field all work as usual. In URP they run at the game resolution, so they come out in game pixels too.
- Tonemapping and Color Adjustments also apply after the palette and change its colours. For a palette shown exactly as defined, set Tonemapping to None (or Neutral, which changes least) and leave colour grading neutral; use the look's own Saturation and Contrast instead, which run before the palette.
- Pixel Eras works on displayable colours: anything brighter than white is clipped to white before the palette. Bloom still catches the brightest palette colours; lower its Threshold below 1 to make them glow.
- CRT and VHS are drawn last, over the post-processed picture, at full resolution.
HDRP
Everything in this guide works in HDRP unless noted here. Pixel Eras runs as one global Custom Pass before post-processing, registered by the package itself: no scene needs a Custom Pass Volume, and nothing is added to your scenes.
- HDRP renders the scene at the screen's full resolution.
- The Uber pass takes the game picture from it: the texel under the centre of every game pixel, or the average of a 2×2 block with 2×2 Sampling. The picture is therefore exactly as sharp and as aliased as URP's low-resolution render.
- Present writes it back over the camera colour at its whole-number scale, with CRT and VHS. HDRP's post-processing then runs on it at full resolution, and its final pass copies the result to the screen.
What differs from URP
- Cost. The scene is not rendered at the game resolution, so the look costs a little (Uber at the game resolution, one full-resolution Present) instead of saving time.
- HDRP_RETRO/Lit and HDRP_RETRO/Terrain light from HDRP's own lights: the sun (the directional light that casts shadows) per vertex with HDRP's shadow per pixel, other directional, point and spot lights per vertex, and the sky's ambient probe. Area, box and pyramid lights, cookies, light layers, lightmaps and light probes are not read. Lighting is multiplied by the camera's exposure, as HDRP Lit does; HDRP_RETRO/Unlit colours and emission are written as they are, as HDRP Unlit does.
- Fog on Retro materials comes from HDRP's Fog override: HDRP fogs opaque surfaces, and transparent Retro materials fog themselves, as HDRP Lit does.
- Not supported in HDRP: Dynamic Resolution and upscalers (DLSS, FSR) — Pixel Eras sets the resolution itself, and Pixel Edges and Stable Dither would read the wrong pixels; MSAA turns Pixel Edges and Stable Dither off; XR. Camera anti-aliasing (TAA, SMAA, FXAA) works on the full-resolution scene and makes game pixels shimmer: turn it off.
- Custom Passes must be enabled in the camera's Frame Settings (they are by default).
- The Shader Graph sub graphs work in HDRP graphs. URP_RETRO/Sprite is a URP 2D Renderer graph; in HDRP, sprites convert to HDRP_RETRO/Unlit.
Doctor checks the HDRP side too: Always Included Shaders, Dynamic Resolution and camera anti-aliasing.
Workflows
Step-by-step recipes for the most common kinds of game. Each starts from a scene with Make it Retro done (Quick start), and each step links to where the setting is explained.
A 32-bit console game (first 3D consoles)
- Retro Studio → Eras → 32-bit Console → Use. 240 game pixels tall, dithered 15-bit colour.
- Assets → Convert scene materials, then Eras → Apply to Retro materials in this scene: vertex wobble, affine textures and point filtering from the era (Retro materials).
- On the Pixel Eras Camera set Draw Distance (for example 40) and, in the look, turn on Retro Fog with Hide Draw Distance: far polygons drop out inside the fog (Fog).
- On every lamp add Pixel Eras Light (a pattern for torches and neon); in the era's Lighting section set Light Rings to 3–4 (Pixel Eras Light).
- In your style's Animation section set Frame Rate to 15, and on every character's root add Pixel Eras Animation and Pixel Eras Stepped Motion: they move in 15 steps a second (Stepped animation and motion).
- Doctor → Fix all, then Play. Fine-tune with New style → Look.
3D pixel art (orthographic)
- Set the camera's Projection to Orthographic and turn on Smooth Pixel Camera: the scenery keeps the same pixels while the camera glides (Pixel stability).
- Use HD Pixel Art, or a style of your own, and set Resolution to Fixed Resolution at 360 (or 180): every player sees the same picture with no border on 720p, 1080p, 1440p and 4K (The same picture for every player).
- In Pixel Edges use Outline 1, Position Outside, and a Highlight of about 0.5.
- On objects that move across the screen add Pixel Eras Stepped Motion with Snap to Pixels (with a Frame Rate of 0 they still move smoothly, but always on whole pixels).
- Select the art folder → Retro Studio → Assets → Import Rules → Add rules: point filtering, no mipmaps, no compression.
- HUD: a Screen Space Overlay canvas with Pixel Eras Canvas Scaler, so a UI pixel is a game pixel (UI).
A 2D sprite game (URP 2D Renderer)
- Make it Retro adds the Pixel Eras feature to your 2D Renderer Data.
- Remove URP's Pixel Perfect Camera if the camera has one: the Pixel Eras Camera replaces it (Doctor offers the fix).
- Set Resolution to Fixed Resolution at the height your art is drawn for, with Pixel Perfect scaling.
- Give every sprite the same Pixels Per Unit, point filtering (Import Rules set both) and whole-number scales.
- Optional: Convert to Retro Shaders turns sprite materials into URP_RETRO/Sprite — hit flash and dithered (screen-door) transparency.
- Palette, dithering, colour depth, fog-free looks, CRT, VHS, composite and LCD all work; Pixel Edges and Stable Dither need the Universal Renderer and are skipped.
Looks that change in play
- From code:
retro.TransitionTo(era, 1.5f)crossfades; settingretro.Eraswitches at once (see Scripting API). - By place: clear the camera's era and drive the look from Volumes — a global Volume with your base look, and local Volumes (with a Blend Distance) holding a Pixel Eras Look for a cave, a dream or a flashback. They blend as the camera moves.
- As an effect: change a value of the look for a moment — a VHS tear on a hit, a palette
for a power-up. Change a copy of the era, not the asset (code under
Changing a look at runtime); the demo's
DemoEffects.csdoes it this way.
A graphics menu for players
Everything a player may want to choose is a plain field, safe to change at any time:
| Menu item | Code |
|---|---|
| Retro look on / off | retro.enabled = on; — lights, fog, stepping and halos switch with it |
| Pixel size | retro.resolutionMode = PixelErasResolutionMode.PixelScale; retro.pixelScale = 4; |
| Fill or border | retro.scaling = PixelErasScaling.PixelPerfect; |
| Smoother edges | retro.sampling = PixelErasSampling.Supersample2x; |
| Era | retro.TransitionTo(eras[i], 0.5f); |
| CRT / scanlines | on a copy of the era: look.crt.Override(on); |
| Animation frame rate | on a copy of the era: era.animationFrameRate = 12; |
Saving the choices (PlayerPrefs or your own save) is up to your game. The demo's pause menu
(Demo/Scripts/DemoSettings.cs) is a complete example.
Stepped animation and motion
- Set the rate once, in your style: Animation → Frame Rate. Every built-in era ships smooth (0), so nothing steps until you ask for it; rates true to the hardware are about 8 for 8-bit and handheld eras, 12 for 16-bit, 15 for 32-bit and 20 for 64-bit.
- Characters: Pixel Eras Animation and Pixel Eras Stepped Motion on the root. Animation steps the pose, Stepped Motion the walk; both follow the era and step on the same frames.
- Props that move (pickups, doors, platforms, projectiles): Pixel Eras Stepped Motion.
- Particles: one Pixel Eras Stepped Motion on the root that holds them — an effect prefab, or the level's root for fire and leaves (it never moves the root itself). UI or anything else under that root that must stay smooth goes into its Ignore list.
- Your own scripts:
PixelErasStep(Scripting API).
Rules for Stepped Motion — what keeps it smooth underneath and stepped on screen:
- A camera and what it follows hold the same. With a Stepped Motion on a follow camera, give the target the same Hold Position and Rotation and the same rate; otherwise the target slides across the held view and the view catches up with a jerk. For the whole picture held at a rate, the camera's View Frame Rate is simpler and cheaper.
- Teleports and respawns: call
Refresh()afterwards, or the object shows its old place until the next step. - Rigidbodies with interpolation: put the component on the model under the body, not on the body.
- Children added later (a weapon, a costume), or a changed Ignore list: call
Refresh(). Particle Systems added later are found by themselves. - Reading the transform in Update, LateUpdate, physics and coroutines gives the true
pose. Only code that runs after rendering (
OnGUI,WaitForEndOfFrame) sees the held step. - Particle speed: the component multiplies each system's Simulation Speed; set your own speed before the component finds the system, not every frame.
- Snap to Pixels moves the object only within one game pixel, on screen, for rendering; physics never sees it.
Your own palette
- Drop a
.hex,.gplor.palfile into the project (from Lospec, GIMP or Aseprite) and press Make Editable Copy in its inspector — or make one with Create → 4ssets → Pixel Eras → Palette. - Put it in your style's Palette and set Color Bits to 8, so the palette alone decides the colours.
- Raise Contrast and Brightness until the scene uses the palette's whole range; add dithering for the in-between shades.
Pixel Eras Camera
Add Component → Pixel Eras → Pixel Eras Camera. The inspector groups the settings in foldable sections — Style, Picture, Motion, Distance — in the same order and with the same names as Retro Studio's Look tab and the demo menu, and shows the game resolution and Doctor's verdict. Untick the component to compare with the plain picture — every Pixel Eras effect switches off at once.
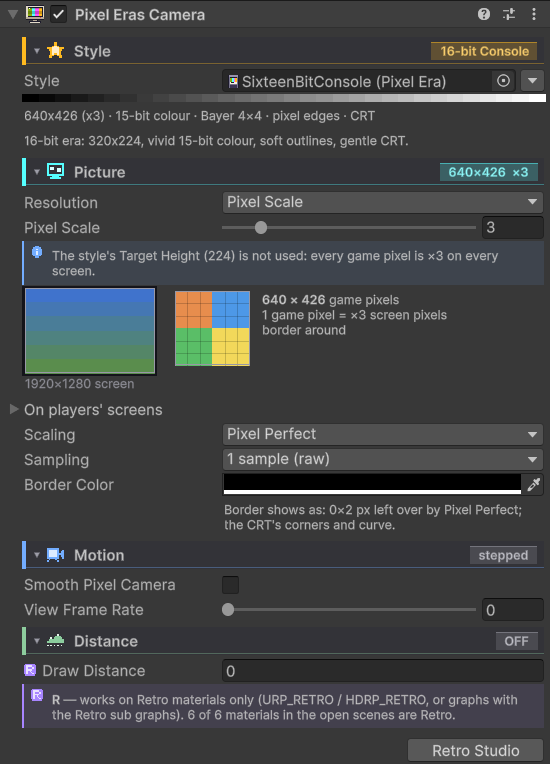
| Field | Description |
|---|---|
| Style | A complete look — a built-in era or one of your styles: resolution, palette, dithering, edges, CRT and VHS. It replaces any Pixel Eras Look from Volumes for this camera only. Leave it empty to drive the look from your Volumes. The arrow beside the field lists every style in the project; picking one there also applies the picture settings your style carries. |
| Resolution | How the size of the game picture is chosen. Target Height: a height in game pixels — the style's, else the camera's Target Height — and the whole-number scale whose height comes closest, so a style shows about as many pixels on any screen (430 on 1080p is ×3, 360 tall; on 4K ×5, 432 tall). Pixel Scale: every game pixel is a fixed number of screen pixels on every screen, and styles' heights are not used; a larger screen shows more game pixels. Fixed Resolution: exactly the target height on every screen, so every player sees the same picture — see The same picture for every player. A built-in era leaves it as it is; your own style keeps the mode and the scale it was tuned with and puts them on the camera. |
| Target Height | Height of the game picture in game pixels when no era sets one. In Target Height mode with Pixel Perfect it snaps to the nearest height that divides the screen evenly; in Fixed Resolution it is exact. The width follows the screen's aspect ratio. |
| On players' screens | Under the resolution: the picture, scale and border this camera gives on common screens — 720p to 4K, 16:10, ultrawide and Steam Deck — with its settings and style as they are now. |
| Pixel Scale | Pixel Scale mode: screen pixels per game pixel, 1–16. ×3 on 1920×1080 is 640×360, on 2560×1440 853×480. Above ×10 the scene renders at a multiple of the picture, as with low Target Heights. |
| Scaling | Pixel Perfect Fill (default): whole-number scale (up to ×10), every game pixel exactly the same size, filling the screen — the leftover fraction of a pixel is cropped off the edges. Pixel Perfect: the same, with a thin border around the picture instead of cropping. Sharp Fill: exactly the target height at a fractional scale; pixel edges blend over one screen pixel. Below about ×3, fine patterns such as dithering beat against the screen's pixels and show stripes that shimmer as the camera moves — prefer Pixel Perfect Fill. |
| Border Color | Shows in three places: the screen pixels Pixel Perfect leaves over when the screen is not an exact multiple of the picture, the one-pixel frame of the Smooth Pixel Camera, and the corners and curve of a CRT. The inspector says under the field where it shows right now. |
| Sampling | 1 sample: each game pixel is one sample of the scene — cheapest, but thin objects flicker as they move. 2×2 samples: the scene renders at twice the game resolution and each game pixel averages a 2×2 block before the palette — clean edges and steadier thin objects for four times the pixels of the game picture (still far fewer than the screen). Not used in Compatibility Mode. |
| Smooth Pixel Camera | The camera glides by sub-pixels instead of jumping a whole game pixel, while still scenery keeps exactly the same pixels. Adds a one-pixel frame around the picture. See Pixel stability. |
| Focus Distance | Perspective cameras with Smooth Pixel Camera: the view depth that stays perfectly still while the camera moves. 0 = Auto (default): the distance to whatever is at the centre of the view — anything with a collider, such as the player or the ground — followed only when it changes by more than a fifth. Set a value to fix it. |
| Draw Distance | Polygons beyond this view depth pop out whole, as on 32-bit consoles, instead of being cut by the far plane. Pair it with fog. Works with Retro Lit, Retro Unlit and graphs using the Retro Vertex Snap sub graph. Pixel Eras Lights past it go out (in Play Mode) and their halos drop with them. For what it does not reach — world-space UI, particles, sounds — ask IsInDrawDistance (see Scripting API). 0 = off. |
| View Frame Rate | Shows the scene at this many frames per second while the game runs at full rate — the stepped look of stop-motion and slow consoles. Held frames skip scene rendering, so they cost almost nothing; UI, CRT and VHS stay at full rate. 0 = every frame. Play Mode only. |
Each camera with a Pixel Eras Camera gets its own look. Doctor reports cameras that render into a Render Texture or cover only part of the screen.
The same picture for every player
Players have different screens. Pick what must stay the same:
- The picture — every player sees as many game pixels, so pixel art, level design and what is on screen are the same for all: Fixed Resolution. The scale changes with the screen, and should: a 640×360 picture is ×3 on 1080p, ×4 on 1440p, ×6 on 4K, and fills each of them. The game looks the same; only the screen is sharper.
- The size of a game pixel on the screen — Pixel Scale. A larger screen then shows more of the scene in more game pixels: ×3 is 640×360 on 1080p and 1280×720 on 4K. Good for a player-facing setting, or a game made for one screen.
- About the same, never a border — Target Height. The nearest whole scale is used, so the height varies a little: 360 is 360 rows on 1080p but 400 on 1920×1200 and on Steam Deck.
Fixed Resolution renders exactly the target height. When the screen's height is not a multiple of it, the rest is a choice every pixel game makes:
- Pixel Perfect (and Pixel Perfect Fill, which would have to crop the picture): the largest whole scale that fits, with a Border Color frame around the picture. Every pixel is square and even. 360 on 1920×1200 is ×3, with 60 px top and bottom and 96 px at the sides.
- Sharp Fill: the same picture stretched to fill the screen at a fractional scale. No border; pixels differ by a screen pixel.
Heights that fill 720p, 1080p, 1440p and 4K with no border: 360, 180, 120, 90. 240 (the PlayStation's) fills 720p, 1440p and 4K, with a border on 1080p. The camera inspector's On players' screens list shows what each common screen gets.
The vertical field of view is fixed, so the picture is as tall in the world on every screen; the width follows the screen's aspect, so a wider screen sees more at the sides, as in most 3D games. Screen-space UI covers the whole screen, the border included.
Pixel stability
A low-resolution 3D picture shimmers when the camera moves, because every frame samples the scene at slightly different points. Smooth Pixel Camera removes that:
- Orthographic camera — every pixel is held still. The view snaps to the game-pixel grid and the leftover fraction of a pixel becomes a smooth shift of the whole picture on the screen. Scenery never crawls; the camera still glides. Recommended for 3D pixel art.
- Perspective camera — turning is held still, and moving holds the scenery at the Focus Distance still (measured automatically from the centre of the view). The view is redrawn only when the camera has moved a whole pixel, and the picture glides in between. Scenery nearer or farther than the Focus Distance still shimmers a little, because perspective moves it at a different speed. A floor seen at a steep angle shimmers while the camera moves forward or back: its near and far rows move at different speeds, and no shift can hold them all. That is a limit of perspective itself.
LateUpdate, after the target). A camera that keeps re-aiming at a lagging
target turns a little every frame, and every turn is a redraw.Camera stacks
With URP Base + Overlay cameras, put the Pixel Eras Camera on the Base camera. Every overlay camera (a first-person weapon, for example) draws into the same low-resolution picture, and the look is applied once, after the last camera. A Pixel Eras Camera on an overlay camera is ignored (Doctor says so). View Frame Rate is off for stacked cameras, as the overlays would draw over a held frame.
In the Scene view
Press Pixel Eras in the Scene view's toolbar (an overlay) to see the main Pixel Eras Camera's look while you build: the same era, as many game pixels as the Game view shows at the Scene view's size, the palette, dither, edges, fog, halos and screens. Gizmos, the grid and handles stay sharp on top. Press it again for the plain Scene view; the choice is remembered.
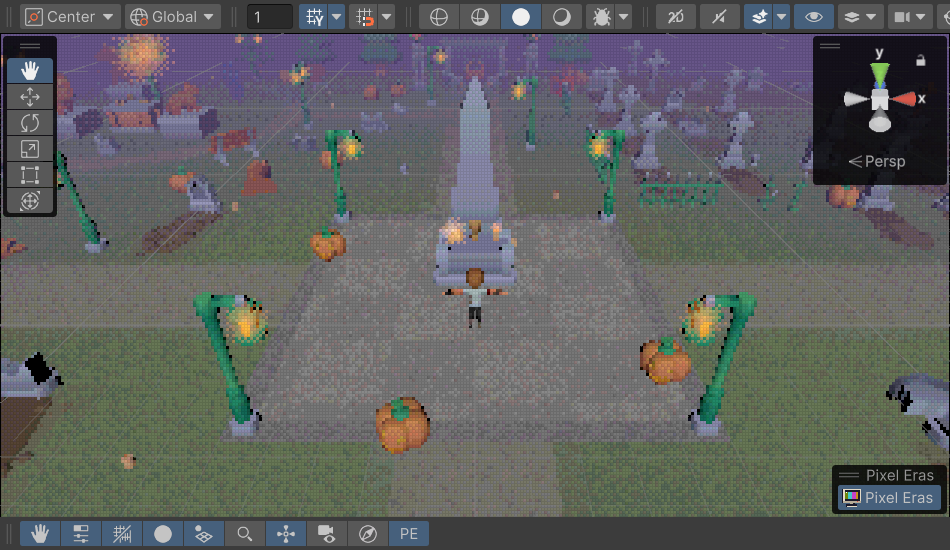
- The Scene view's camera gets a hidden copy of the Pixel Eras Camera, kept in step with it. The copy keeps its own pictures, so the Game view never changes, and nothing is saved in the scene.
- Fog is measured from the Scene view's camera: zoomed far out, the whole scene may sit in it.
- View Frame Rate and the Smooth Pixel Camera's glide play in the Game view only, so the view you work in never stutters or shifts.
- URP's Compatibility Mode (Render Graph off) shows the look in the Game view only.
Eras
An era (Create → 4ssets → Pixel Eras → Era) bundles a target height, a Volume Profile holding one Pixel Eras Look, and suggested settings for Retro Lit materials (vertex snap, affine mapping, texture filter). Twenty ship with Pixel Eras:
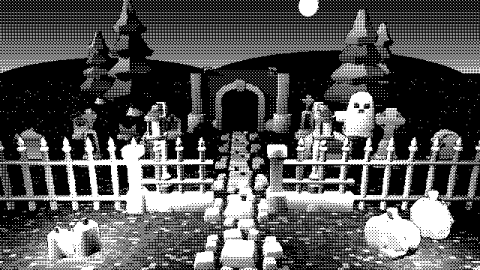
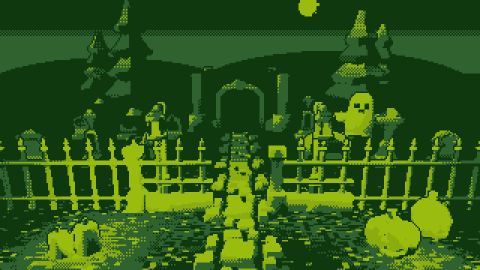
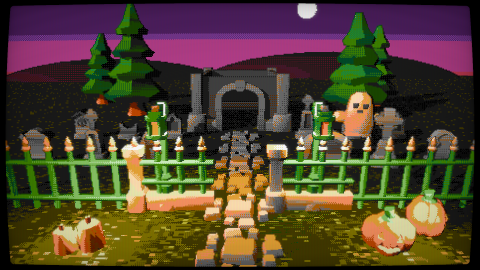
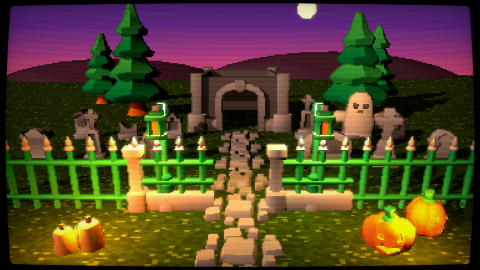
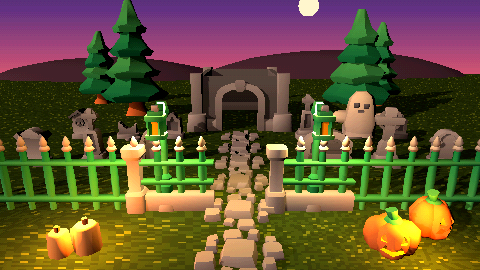
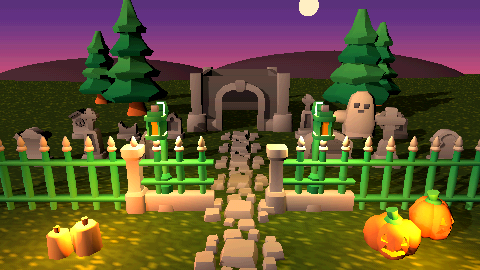
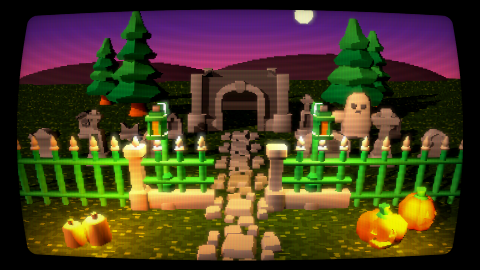
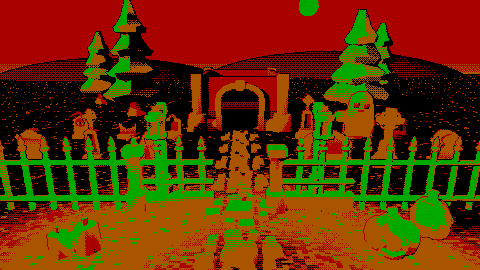
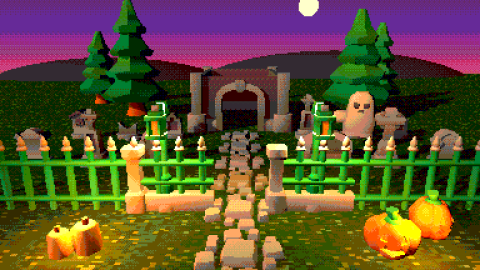
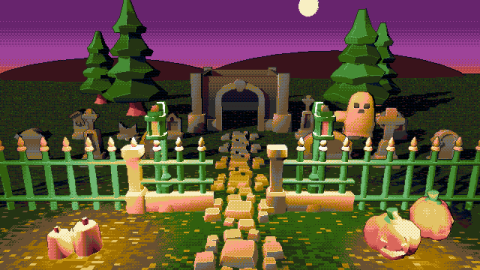
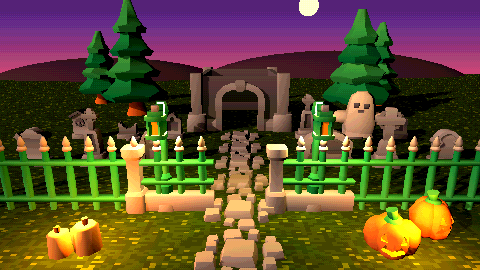
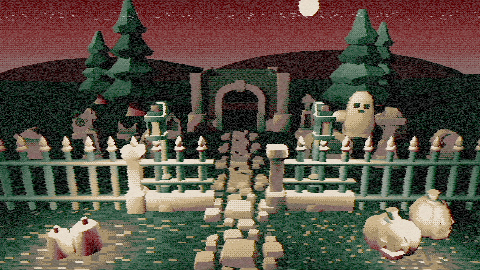
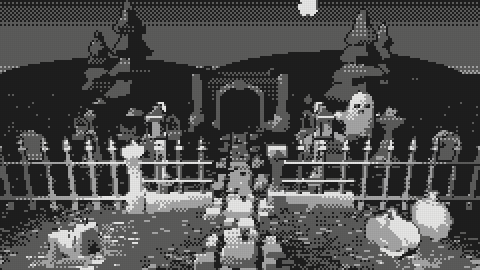
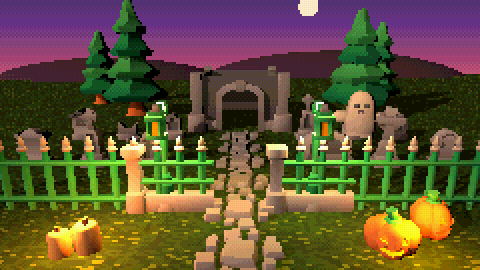
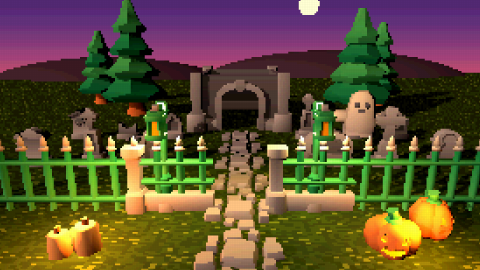
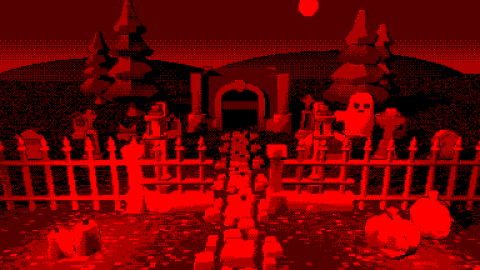
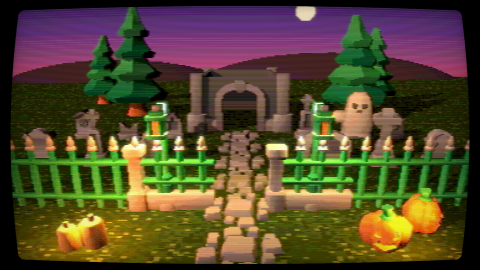
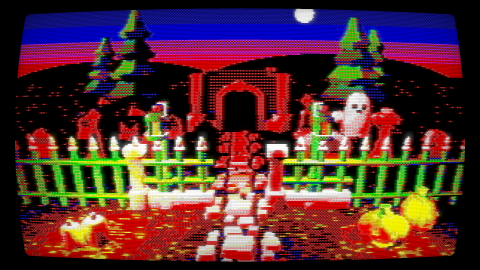
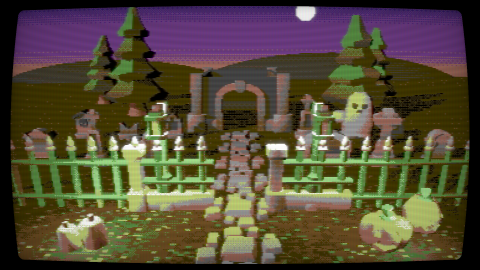
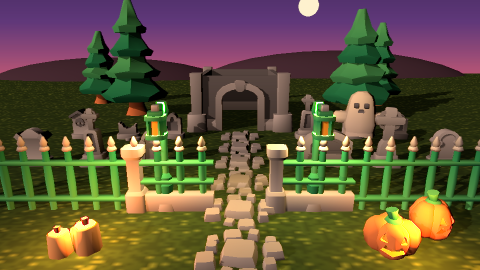
Pick one in Retro Studio → Eras (press Apply to Retro materials in this scene
for its material suggestions), choose one from the arrow beside the camera's Era field,
or switch from code with Era / TransitionTo.
Your own styles
The built-in eras are templates: Retro Studio never changes them, so a package update can never overwrite your work. To make a look of your own:
- In Retro Studio → Eras, press New style on the era closest to what you want (or New style from the current look).
- Give it a name, a short description (one line, shown on its card) and a full description, then press Create and use. The style goes on the camera and the Look tab opens.
- Tune everything in the Look tab. Your style saves itself a moment after each change: the look, the picture settings (Resolution mode and Pixel Scale, scaling, sampling, Smooth Pixel Camera, View Frame Rate, Draw Distance — projection stays with the camera) and the material shapes.
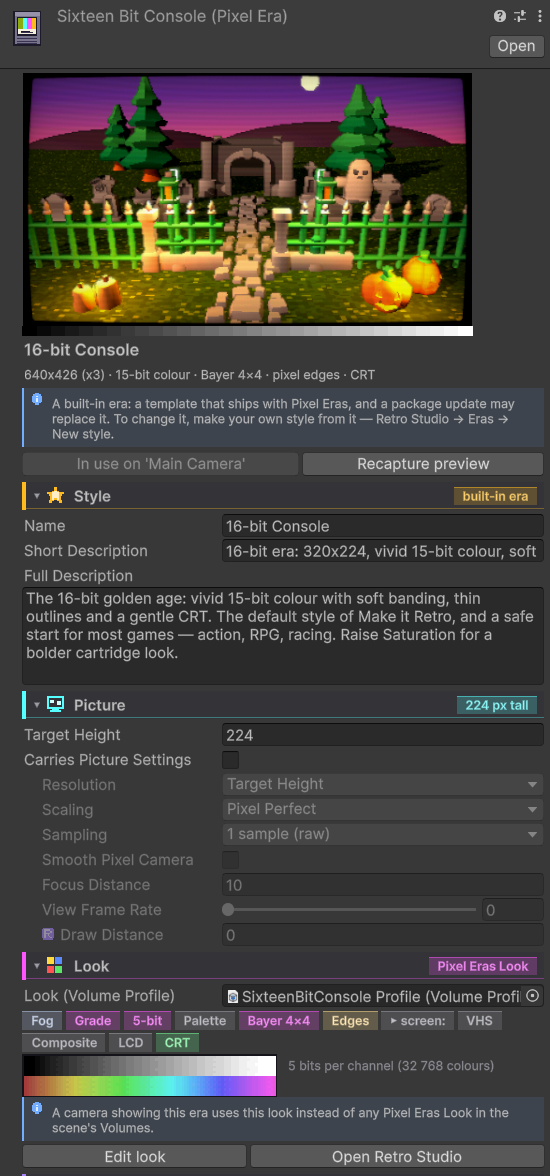
Your styles are listed first in the Eras tab and live in Assets/Pixel Eras Styles/ as
project assets. Use one in any scene with Use: the camera gets the look and the style's
picture settings. Tick Default for new scenes in the Look tab, and Make it Retro gives every
new scene that style; the choice is saved in ProjectSettings/PixelErasStudio.asset, so
the whole team shares it. An era reads only the Pixel Eras Look in its profile; other overrides
there are ignored.
Each style is one file: the era with its look inside, plus its preview picture. Delete, on its card or in the Look tab, asks first, then moves both to the system trash, where you can restore them. Cameras in the open scenes that showed it switch to the default style. Built-in eras cannot be deleted.
Previews
A PNG named like the era, in the era's folder, is its preview (Eras/ArcadeCrt.png
for ArcadeCrt.asset). For your own era press Capture preview from Game view in
its inspector: the camera shows the era for one frame and the frame is saved beside the era.
Previews are not referenced by anything, so they never enter a build.
Pixel Eras Look (Volume override)
Add Override → 4ssets → Pixel Eras Look on any Volume. It blends like other overrides, so a trigger volume can turn a cave into 1-bit or a dream sequence into VHS. A camera with an era ignores Volume looks; clear the era to use them. Settings of a stage that is switched off (CRT, VHS, Composite Video, LCD) are greyed out.
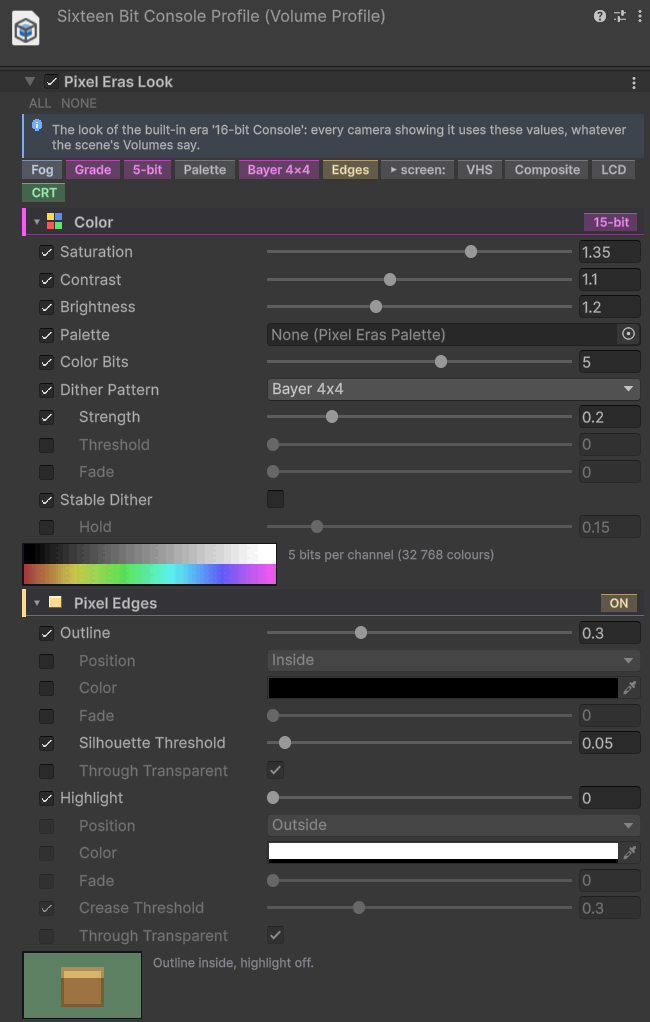
Every inspector of Pixel Eras — the Volume override, the Pixel Eras Camera, eras and styles, Retro Studio's Look tab — draws the settings the same way:
- Section cards with a chip saying what the section does right now (548×308 ×7, 32 colours, ON). Click a card to fold it.
- The chain at the top: every stage of the look in the order it runs — grade, colour depth, palette, dither and edges at the game's resolution, then the tape, the cable, the LCD and the tube at screen resolution. Lit chips are on.
- Pictures of what the settings do: a ramp through the palette and dither, a box with its outline and highlight, a test picture through the screens, the screen with the game picture and one game pixel close up, the light bands.
- Notes where a setting is edited: blue — worth knowing; gold — it will not do what you expect; red — two settings work against each other; purple — needs Retro materials.
Color
| Parameter | Description |
|---|---|
| Saturation | Colour intensity before the palette and colour depth. Above 1 gives the vivid colours of old games; below 1 mutes them. 1 = unchanged. |
| Contrast | Contrast before the palette and colour depth, around mid-grey. Above 1 separates flat, mid-toned scenes into clearer light and dark, so a small palette keeps them readable and dithering covers less of the picture. |
| Brightness | Lifts the darks and mid-tones before the palette and colour depth (a gamma on the colour), keeping black and white where they are. Above 1 keeps a dark or night scene from sinking into the palette's darkest colour — with a four- or two-colour palette a night level otherwise turns almost entirely into one colour. Below 1 deepens the shadows. 1 = unchanged. |
| Palette | Reduce the picture to these colours. Empty keeps every colour. |
| Color Bits | Bits per channel. 8 = full colour, 5 = the 15-bit look of 32-bit consoles. |
| Dither Pattern | None, Bayer 2×2 / 4×4 / 8×8, Blue Noise or Custom Texture. Its Strength, Threshold, Fade and Pattern Texture sit under it. |
| Dither Strength | How much dithering blends neighbouring colours. The step is measured between the two palette colours each pixel lies between (or one colour-depth step), so the pattern stays a clean ordered dither with any palette: 1 mixes fully, lower keeps colours near a palette colour flat and calm. |
| Dither Threshold | How much of an area the pattern must cover before it dithers. 0 dithers every in-between shade; higher keeps colours near a palette colour flat and dithers only the middle of each transition — flat areas with patterned steps, as many old games drew them. |
| Dither Fade | Subdues the pattern without moving it: the pixels the dither flips are drawn part-way back toward the flat colour, so the dots read fainter. 0 = full contrast, 1 = no visible pattern. Above 0 the flipped pixels leave the palette. |
| Pattern Texture | For Custom Texture: a threshold texture tiled once per game pixel, read from red (darkest lights first). See Custom dither patterns. |
| Stable Dither | Keeps faint dither and colour edges still while the camera moves. A pixel keeps its colour for as long as the same spot of surface stays inside it (found through the depth buffer and last frame's camera) and that colour still lies among the colours of the pixels around it. Once the spot leaves the pixel, the pixel decides afresh, so the pattern moves with the surface in whole pixels and never trails behind; moving objects and changing light update at once. Reads the depth buffer and keeps one small texture at the game resolution. Universal Renderer only. |
| Stable Dither Hold | How far, as a share of one colour step, a held colour may stray beyond the colours around it. Higher keeps faint dither calmer in flat areas; lower follows slowly changing light more closely. Default 0.15. |
Custom dither patterns
Set Dither Pattern to Custom Texture and give it a Pattern Texture: the dither then draws your pattern instead of Bayer or blue noise. The texture tiles once per game pixel. Its red channel is a threshold: as a colour gets brighter, the darkest texels switch to the next colour first, so the order of the values is the shape the pattern grows in.
- Examples:
Pixel Eras/Dither Patterns/has eight — Lines, Columns, Diagonal, Crosshatch, Grid, Halftone (clustered dots), Diamond and Stipple. The demo menu's Dither Pattern row steps through them after the built-in patterns. - Your own: draw the shape in any picture (the darker a pixel, the earlier it lights up),
select it and choose Assets → 4ssets → Pixel Eras → Create Dither Pattern from Image. It
ranks the pixels by brightness and spreads them evenly over the 256 levels, as a Bayer matrix
does, and saves
name_pattern.pngbeside the picture. 4×4 to 16×16 reads as a pattern; larger tiles read as texture. - Import: the shader reads each texel as drawn, so the texture needs sRGB off, Point
filtering, no compression and no resize. Textures in a folder named
Dither Patterns, or named…_pattern, import that way by themselves; Doctor warns about a pattern that does not. - No texture set: the dither stays on with Bayer 4×4.
Pixel Edges
| Parameter | Description |
|---|---|
| Edge Outline | A line one game pixel wide at every silhouette, in Outline Color: how strongly. A silhouette is a jump in depth; a floor or wall seen at a grazing angle is not one, however steeply it recedes. Needs the depth texture (requested automatically). |
| Outline Position | Inside darkens the object's own edge pixels. Outside draws the line around the object, on the pixels just beyond its silhouette (the background included), in a darker shade of the object's colour — the classic sprite outline; the object keeps all its pixels. |
| Outline Color | The colour the outline goes to; Edge Outline sets how far each line pixel goes from the surface's own colour toward it. Black (the default) gives a darker shade, solid black at 1; a dark purple or brown gives the coloured outlines of much pixel art. The line goes through the palette like the rest of the picture, so with a palette it lands on the nearest palette colour. |
| Outline Fade | Makes the outline see-through: each outline pixel, once reduced to the palette, is mixed back toward the colour it would have without the outline. 0 = solid, 1 = gone. Unlike a lower Edge Outline, which may land on the same palette colour as no outline at all, the line stays visible but light. Above 0 outline pixels leave the palette. |
| Edge Highlight | A light line one game pixel wide along every ridge — a fold of a surface that bulges toward the camera, like a box's edges: how bright. Folds inward, where a wall meets the floor, stay unlit. Needs depth and normals — in URP an extra geometry pass. |
| Highlight Position | Which face of the ridge carries the line, the same face all along it. Inside: the face turned toward the camera. Outside: the face turning away (a box's top seen from the front). |
| Highlight Color | Tints the highlight. White (the default) keeps each surface's own colour, brightened; a warm or cool colour tints that brightened colour. Alpha: how far the line takes the colour as it is instead — at 1 every ridge gets the same colour, whatever the surface (white at 1: a white line). It goes through the palette like the rest of the picture. |
| Highlight Fade | Makes the highlight see-through, the same way as Outline Fade. 0 = solid, 1 = gone. Above 0 highlight pixels leave the palette. |
| Silhouette Threshold | Under Outline: how large a depth step counts as a silhouette, relative to distance. Minimum 0.01. |
| Crease Threshold | How sharp a bend counts as a crease, 0.01–1: 0.01 lights the faintest bend, 0.3 about 45°, 1 only right angles — the sharpest a surface folds. |
| Through Transparent | Under Outline and under Highlight: whether the line shows through transparent surfaces in front of it (glass, smoke, particles). Off: where a transparent surface covers the line, it fades out with how much the surface hides. Costs one copy of the picture at the scene's resolution. |
Outline and highlight work together: a pixel takes the outline first, and a highlight never crosses a silhouette, so both can be on with any positions without doubling up.
Edges are drawn only where they make a shape: a fragment of fewer than three pixels — a speck from a polygon smaller than a pixel, a sliver of depth or a noisy normal — is left out, while lines and corners keep every pixel, their ends too.
Pixel Edges need the Universal Renderer's depth and normals; on the 2D Renderer they are skipped and the rest of the look applies.
Fog
Retro fog over the scene by depth, drawn after opaque surfaces and before transparent ones, and before the palette: it lands on the era's colours and dithers with them. It works on every material; transparent Retro materials fog themselves the same way, other transparent materials are drawn over the fog unfogged. Edge lines fade into the fog with the surfaces they are on. Turn Unity's own fog (Lighting window) off: it would fog the materials that support it a second time.
| Parameter | Description |
|---|---|
| Retro Fog | On or off. Adds one pass at the scene's resolution. |
| Mode | Linear: from Start to End, as 32- and 64-bit consoles did it. Exponential and Exponential²: thicker with distance by Density, from Start. |
| Color | The fog's colour. Night scenes look best with a dark fog close to the sky's. |
| Start, End, Density | Where the fog begins, where linear fog is complete, how fast exponential fog thickens. |
| Opacity | The most the fog covers: lower keeps far things faintly visible. |
| Fog the Sky | Whether the sky and background are fogged too. |
| Bands, Band Dither | The fog in flat steps of thickness, with an ordered dither between them in game pixels: the stippled fog edge of the 32- and 64-bit era. 0 bands = smooth. |
| Ground Fog, Top, Soft Depth | Fog lying on the ground: how thick at the bottom, the world height of its top, and how far below the top it is at full thickness. |
| Drift, Patch Size, Speed | Slow-moving patches where the fog grows thicker and thinner. Driven by game time: a paused game holds them still. |
| Hide Draw Distance | The fog closes in before the Pixel Eras Camera's Draw Distance, so polygons that drop out vanish inside it, as on 32- and 64-bit consoles. |
Fog is a Volume setting like the rest of the look: fog zones are Volumes with their own Fog, and they blend as the camera moves. A camera showing an era uses the era's fog. Every built-in era has its own fog, made for a night level seen from about ten metres: retune Start and End for your scene's scale.
CRT
Switch CRT on, then: Curvature, Scanlines (the beam widens on bright areas, so brightness is kept), Phosphor Mask (Aperture Grille, Shadow Mask, Slot Mask) and Mask Strength, Softness (horizontal beam smear), Glow (computed at half the game resolution), Corner Radius, Vignette.
VHS
Switch VHS on, then: Jitter (sideways line shake, in game pixels), Noise, Color Bleed, Tracking (a band of torn lines rolling down).
Composite Video
The picture as a family TV received it over a composite cable: brightness and colour share one signal along each line, so neighbouring pixels run together. One-pixel dither stripes melt into the extra shades and see-through effects 8- and 16-bit games were drawn for. Blend: how far brightness runs into the neighbours (1 melts stripes completely). Color Bleed: how much further colour spreads. Lines never mix. Pair it with dithering (Bayer 2×2) and CRT.
LCD
The picture on an early handheld's screen. Pixel Grid: the dark gaps between the pixels, drawn from ×2 scale up. Ghosting: the slow response of early panels; moving things leave a fading trail. It is measured per 1/60 s, so it lasts as long at any frame rate, and runs in Play Mode only (Edit Mode draws too rarely for a trail to mean anything). Keeps two small textures at the game resolution while on.
When settings meet
Some settings change what others do, or override them. The inspectors say so where the setting is edited; in short:
| Together | What happens |
|---|---|
| A style on the camera + Pixel Eras Look in Volumes | The style wins for that camera: Volume looks do not reach it. Clear the style to drive the look from Volumes. |
| A style's picture settings + the camera's | Putting a style that carries picture settings on a camera copies its Scaling, Sampling, Smooth Pixel Camera, Focus Distance, View Frame Rate and Draw Distance onto the camera. Edits on the camera last until the style is put on again; edit your style in Retro Studio → Look to keep them. |
| A style's Target Height + Resolution: Pixel Scale | Pixel Scale ignores the height: every game pixel is ×N on every screen. |
| Fixed Resolution + Pixel Perfect Fill | Fill would crop the exact picture, so it borders it as Pixel Perfect does. |
| An era's material settings + a material's own values | Vertex Snap, Affine Mapping and Texture Filter are set on the scene's Retro materials when Retro Studio applies them (making a style, converting, changing them in the Look tab, Apply in the Eras tab) and replace the materials' values then. |
| Palette + Color Bits | Colours are rounded to Color Bits first, then matched to the palette: near shades merge into one palette colour. Color Bits 8 lets the palette alone decide. |
| Dither without a palette or lower Color Bits | Nothing to dither between: the pattern does nothing. The same for Stable Dither. |
| Dither Fade, Outline Fade, Highlight Fade above 0 | Applied after the palette: those pixels are no longer exact palette colours. |
| Outline + Highlight | Where both fall on one pixel the outline wins. |
| Retro Fog + Unity's fog | Materials that support Unity's fog are fogged twice. Turn Unity's fog off (Lighting window → Environment). |
| Retro Fog + transparent materials | Transparent Retro materials fog themselves; other transparent materials draw over the fog unfogged. |
| Retro Fog + Pixel Edges | Edge lines fade into the fog with the surfaces they are drawn on. |
| Hide Draw Distance without a Draw Distance | Nothing to hide: set a Draw Distance on the Pixel Eras Camera. |
| LCD + CRT | Two screens at once: the LCD grid is drawn, then scanlines and the mask over it. Pick one. |
| VHS Color Bleed + Composite Color Bleed | Colour smears twice along each line, tape then cable. Lower one. |
| Composite Blend + CRT Softness | Both soften along the line; together the picture blurs more than either alone. |
| LCD Pixel Grid below ×2, CRT scanlines below ×3 | No room: the grid is not drawn below ×2, and scanlines and the mask read weakly below ×3. |
| Sharp Fill under ×3 + a fine dither | Game pixels 1 and 2 screen pixels wide in turn beat against the pattern: stripes. Use Pixel Perfect Fill. |
Retro materials
The look itself — grade, palette, dither, Stable Dither, edges, CRT, VHS, composite video, LCD, the resolution, Smooth Pixel Camera and View Frame Rate — is post-processing and works on every material. A few things happen inside the surface shader and need Retro materials (URP_RETRO / HDRP_RETRO, or Shader Graphs built with the Retro sub graphs); the inspectors mark them with a purple R and count the scene's Retro materials beside them:
- Vertex Snap — the wobble of 32-bit consoles.
- Affine Mapping — textures warping across large polygons.
- Texture Filter — Point, Bilinear or the N64's Three Point.
- Light Bands — light in flat steps (Retro Lit and Terrain).
- Draw Distance — polygons popping out whole instead of being cut by the far plane.
- Light Rings — point and spot lights falling off in flat rings (Pixel Eras Light).
They also look best with Point-filtered textures: Retro Studio → Assets → Import Rules sets that up for a folder.
Pixel Eras Light
Lights in old games did not glow smoothly: lamps flickered in steps, light fell off in flat rings, early hardware had no real-time shadows, and a lamp often wore a pixel halo. Add Component → Pixel Eras → Pixel Eras Light on any Light gives it those manners. The light's own intensity, colour and shadows are kept: edit them on the Light as usual, and they come back as they were when the component is removed. With Pixel Eras off — no Pixel Eras Camera enabled, as Retro ON/OFF in Retro Studio does — the lights are plain too: no pattern, no halo, their own colour and shadows, so the comparison shows the whole retro style against none of it.
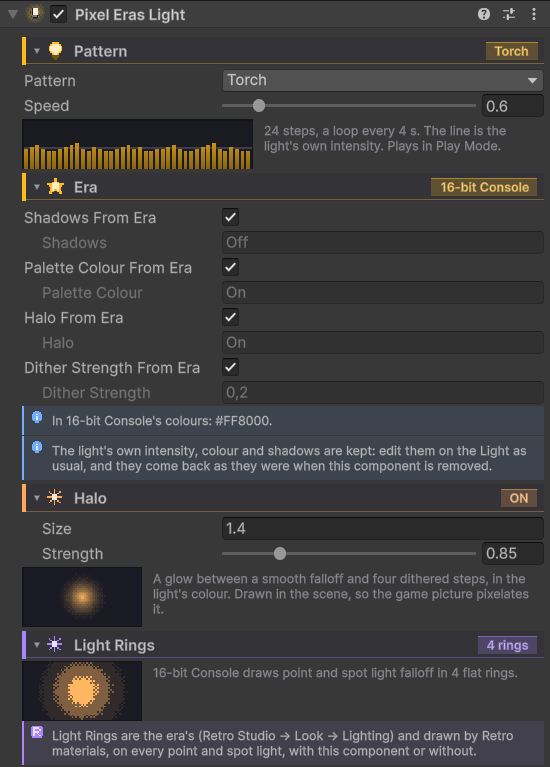
| Setting | What it does |
|---|---|
| Pattern | Brightness in steps, ten a second at Speed 1: Steady, Flicker, Candle, Torch, Fluorescent, Pulse, Strobe, or Custom — one letter a step, a dark, m the light's own intensity, z a little over double. Each light starts at its own step, so lamps lit together do not flicker together. Plays in Play Mode. |
| Shadows | From the era, or set here: As Set keeps the light's own, Off, Pixel (hard), Soft. Pixel and Soft change shadows the light already casts; they never add shadows (that would cost a shadow map). |
| Palette Colour | From the era, or set here: the light's colour moves into the era's palette (or colour depth) with its brightness kept, so lit surfaces stay in the era's colours. A palette with nothing bright near the hue gives white light. |
| Halo | A glow round the light in four flat steps with an ordered dither, in its colour, flickering with its pattern. Drawn in the scene, so the game picture pixelates and reduces it; the fog dims it at the light's distance, and it drops with the lamp past the camera's Draw Distance. Point and spot lights glow round the bulb; a directional light gets a disc in the sky towards it (a sun or a moon), hidden by whatever stands in front and fogged only where the era fogs the sky. The halo goes out with its Light (disabled, or at zero intensity). Size in world units; a directional disc is as large as that would look ten metres away. |
Lighting in an era
Each era has a Lighting section (era inspector, or Retro Studio → Look → LIGHTS): the Shadows and Palette Colour that lights following the era take, and Light Rings with Ring Dither. Light Rings are drawn by Retro materials (Retro Lit and Terrain) on every point and spot light, with a Pixel Eras Light or without: the falloff is read at the middle of its ring, so a light pool becomes flat rings, and the dither blends one ring into the next in game pixels. With rings on, those lights are lit per pixel instead of per vertex, so the rings run round the light instead of smearing across polygons. The lights follow the era of the main camera's Pixel Eras Camera; switching eras changes them at once.
Pixel Eras Animation
Sprites and early 3D characters moved in whole frames, a few times a second. Add Component → Pixel Eras → Pixel Eras Animation on a character's root steps its Animators (and its children's) the same way: in Play Mode they are switched off and moved by whole frames, so their parameters, transitions and events work as before; only the motion holds each pose and jumps.
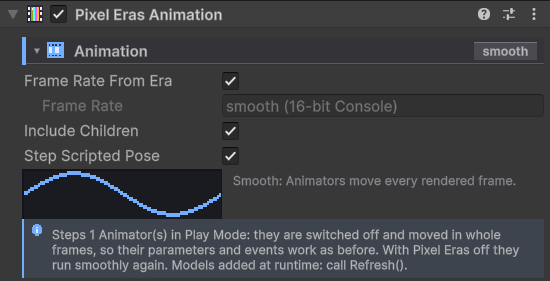
- Frame Rate — the era's (its Animation section; every built-in era ships smooth, set a rate in your style: about 8 fps for 8-bit and handheld eras, 12 for 16-bit, 15 for 32-bit, 20 for 64-bit), or set on the component. 0 = smooth.
- Include Children — step the Animators below the root too.
- Step Scripted Pose — bones that scripts move after the Animator (IK, aiming, a strafe turning the hips in LateUpdate) move in whole frames too: each step's finished pose is held until the next. IK inside the Animator (OnAnimatorIK, Animation Rigging) always steps with it. Off: scripts move the bones every frame, on top of the stepped pose.
- With Pixel Eras off (no Pixel Eras Camera enabled) the Animators run smoothly again.
- A model added at runtime (a new weapon, a costume): call
Refresh().
Pixel Eras Stepped Motion
Animation steps a character's pose; Pixel Eras Stepped Motion steps the object itself: Add Component → Pixel Eras → Pixel Eras Stepped Motion on anything that moves — an enemy's root, a pickup, a door, a projectile — and on screen it moves, turns and scales in whole steps. Only the picture steps: the true transform is put back at the start of every frame, before physics and every script, and the held step is shown after every LateUpdate, for rendering. Game code, colliders and raycasts work with the true, smooth position all the time.
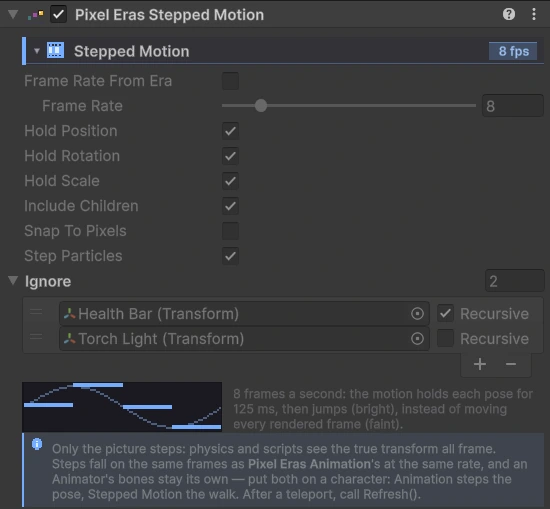
- Frame Rate — the era's Animation frame rate, or set on the component. 0 = smooth.
- Hold Position / Rotation / Scale — what steps; the rest moves every frame.
- Include Children — objects below step too, each in its own local space (a spinning propeller, a swinging sign). An Animator's bones are skipped — they belong to Pixel Eras Animation — and so are objects with their own Stepped Motion.
- Ignore — objects below that keep moving smoothly while the rest steps: a health bar over a stepped enemy, its UI, a light or a trail. Each entry stays where it truly is in the world even while the objects above it are held. Without Recursive only that object is left smooth and its children still step, in its own space; with Recursive everything below it is left smooth too. Particle Systems on ignored objects run at their own pace. It works with Include Children off as well: a child follows its stepping parent unless it is listed here. An Animator's bones and objects under another Stepped Motion cannot be listed; the Inspector names any such entry.
- Snap to Pixels — the object sits on whole game pixels of the main Pixel Eras Camera, so it crosses the screen pixel by pixel, as sprites did — at a Frame Rate of 0 too, for smooth motion on whole pixels.
- Step Particles — Particle Systems on the object and anywhere below it simulate in steps: each step they move on by the step's time, between steps they hold still. Play, Stop, Emit, bursts and sub-emitters work as before, and systems added later are found by themselves. One Stepped Motion on a level's root steps every particle in the level (fire, bats, leaves) and costs nothing for the root itself: a transform that does not move is never written. The systems' Simulation Speed is multiplied by the steps — set it before the component finds them.
- After a teleport or a respawn, call
Refresh(): the object shows where it is at once instead of at the next step. - On a Rigidbody with interpolation, put it on the model under the Rigidbody.
With Pixel Eras Animation. Put both on a character's root: Animation steps the pose, Stepped Motion the walk across the ground. They run on one clock, so a step of the legs and a step forward land on the same frame, and never move the same transform.
Your own scripts. PixelErasStep is that clock: IsStepFrame,
DeltaTime (the time a step covers, 0 between steps), Time (game time
held at the last step), FrameRate and the Stepped event; or
IsStep(rate) for a rate of your own. It counts from game time, so pausing
(time scale 0) holds every step.
Palettes
40 palettes ship in Pixel Eras/Palettes/: the colour sets of classic consoles,
handhelds and home computers (CGA, EGA, 256-colour VGA, the 8-bit console, the 15- and
16-colour home computers, the 27-colour three-level RGB, the late-70s low-res set, four-shade
greens, greys, amber and teal, the red visor, teletext, 1-bit monitors) and artistic sets
(Synthwave, Muted Earth, Pastel, Neon, Dusk and more). To add your own:
- Import a file: drop a
.hex(Lospec),.gpl(GIMP) or.pal(JASC or RIFF) file into the project. It imports as a Pixel Eras Palette; edit the file to change it, or press Make Editable Copy in its inspector. - From an image: select textures → Assets → 4ssets → Pixel Eras → Create Palette from Image. Every distinct colour, in reading order.
- By hand: Create → 4ssets → Pixel Eras → Palette. The palette inspector can also Import… a file, Export .hex… and Sort by Lightness.
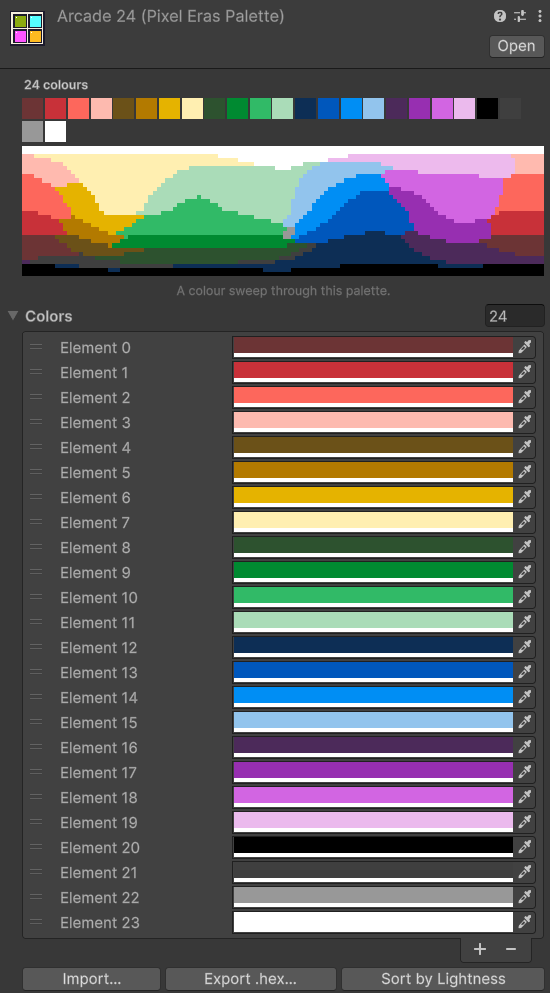
Colours are matched perceptually (OKLab), so dark and saturated colours keep their character.
Shaders
Two families with the same shaders and the same properties: URP_RETRO for URP and HDRP_RETRO for HDRP, both under 4ssets/PixelEras in the shader menu. A Retro material follows the project's pipeline by itself: when it is imported into, or opened in, a project rendering with the other pipeline, it switches to its twin and keeps every value.
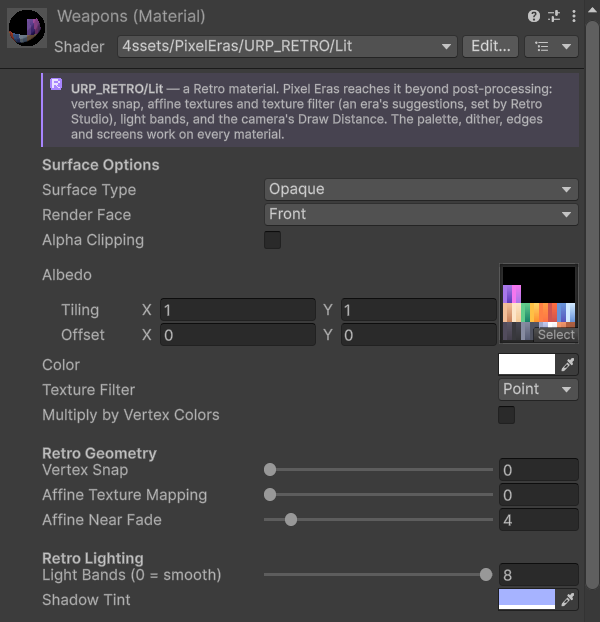
| Shader | Use |
|---|---|
| URP_RETRO/Lit, HDRP_RETRO/Lit | Lit 3D surfaces with per-vertex lighting, like 32/64-bit consoles. Opaque, alpha-clipped or transparent. |
| URP_RETRO/Unlit, HDRP_RETRO/Unlit | Unlit surfaces, optionally multiplied by vertex colours: light baked into a mesh, effects and particles. Opaque, alpha-clipped or transparent. |
| URP_RETRO/Terrain, HDRP_RETRO/Terrain | Unity Terrain drawn the Retro Lit way: four splat layers with retro filtering, per-vertex light, vertex snap and affine mapping. Instanced terrain and holes work; in URP, baked lightmaps too. Layers past the fourth are left out (the first four fill their share). |
| URP_RETRO/Sprite | Sprite Lit Shader Graph for the 2D Renderer: hit flash, screen-door (dithered) alpha. |
Lit and Unlit properties (Terrain has the geometry, filtering and lighting ones):
| Property | Description |
|---|---|
| Texture Filter | Point, Bilinear or Three Point (N64). |
| Vertex Snap | Snaps vertices to the game's pixel grid — the PS1 wobble. |
| Affine Texture Mapping | PS1-style texture warping without perspective correction (visible with perspective cameras). |
| Affine Near Fade | Closer than this the warp fades out, so floors under the camera do not swim. |
| Light Bands | Lit and Terrain: quantises lighting into flat steps. 0 = smooth. Each step between bands ramps over one pixel, so the edges of light pools stay still as a perspective camera moves. |
| Shadow Tint | Lit and Terrain: colour of the unlit side. |
| Multiply by Vertex Colors | Multiplies the colour by the mesh's vertex colours (and a particle's colour). |
| Surface Type | Opaque, or Transparent: blended over what is behind, without writing depth. |
| Blend Mode | Transparent only. Alpha; Premultiply (colour already scaled by alpha); Additive (fire, glows); Multiply (darkens what is behind). |
| Render Face | Front, Back or Both. |
| Alpha Clipping, Threshold | Cuts out pixels below the threshold. Works opaque or transparent. Screen-door dithering often reads more retro than blending for fades. |
Retro Lit works in Forward, Forward+ and Deferred (it renders forward), with the 2D Renderer, and in lightmap baking. In HDRP it renders forward in both Lit Shader Modes and fills HDRP's normal buffer; see HDRP for the lights it reads. Transparent Retro materials do not write depth, so Pixel Edges and Stable Dither see what is behind them.
Converting materials
Retro Studio → Assets → Convert scene materials converts everything the open scenes draw with. Or select materials, folders or prefabs → Assets → 4ssets → Pixel Eras → Convert to Retro Shaders. Materials become Retro ones for the project's pipeline — URP_RETRO in URP, HDRP_RETRO in HDRP — in one Undo step:
| From | To |
|---|---|
| URP Lit, Simple Lit, Complex Lit, Baked Lit, Autodesk Interactive; HDRP Lit, Lit Tessellation, Layered Lit (its first layer); Built-in Standard, Legacy and Mobile shaders | Lit |
| URP and HDRP Unlit; Built-in Unlit | Unlit |
| Particles of every pipeline (URP Particles, Built-in and legacy particles) | Unlit with vertex colours, transparent as they were |
| URP Terrain Lit, HDRP Terrain Lit, Built-in terrain | Terrain |
| URP 2D sprites, Built-in sprites | Sprite in URP; Unlit (transparent, vertex colours) in HDRP |
| Retro materials made for the other pipeline | Their twin |
Colour, albedo with tiling, Surface Type and Blend Mode (URP Surface, HDRP Surface Type, Built-in Rendering Mode), alpha clipping and threshold, render face (HDRP double-sided too) and emission carry over. Picking a Retro shader for a material by hand does the same.
Converting the scene also handles what cannot be changed in place: materials inside a model
or a package (such as the pipeline's default material on primitives) are replaced on those
renderers by Retro copies in Assets/Retro Materials, and a terrain on the pipeline's
default terrain material gets a Retro Terrain material there. Converting again reuses them.
Left as they are, with the reason in the report: skyboxes, UI and text, decals, terrain details and grass, SpeedTree, HDRP AxF, and Shader Graphs and other custom shaders — their inputs are their own, so pick a Retro shader for them by hand, or build the look into a graph with the sub graphs.
Shader Graph sub graphs
In any Shader Graph: Create Node → Pixel Eras. They also work as Custom Function nodes
(Shaders/ShaderGraph/PixelErasShaderGraph.hlsl).
| Sub graph | Stage | Use |
|---|---|---|
| Retro Vertex Snap | Vertex | Feed Position (Object) and Amount; plug the output into Vertex Position. Also applies Draw Distance. |
| Retro Affine UV Vertex | Vertex | Output into a Custom Interpolator (Vector 4). |
| Retro Affine UV Fragment | Fragment | Reads that interpolator; outputs warped UVs. |
| Retro Three Point Filter | Fragment | N64 filtering; use a Point sampler. |
| Retro Color Depth | Fragment | Bits per channel with optional 4×4 dither. |
| Retro Dither | Fragment | Ordered threshold for screen-door transparency or dithered fades. |
| Retro Light Bands | Fragment | Flat light steps, colour kept. |
UI
- Screen Space Overlay canvases draw after Pixel Eras, sharp and at full resolution. Use them for menus and HUDs.
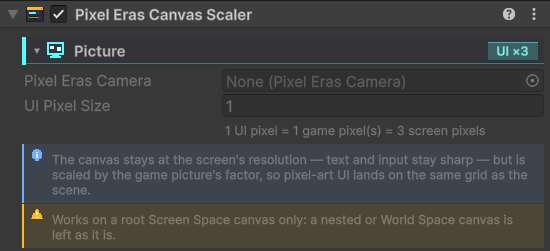
- Pixel Eras Canvas Scaler (Add Component → Pixel Eras → Pixel Eras Canvas Scaler, on the Canvas) scales the canvas by the same factor as the game picture. One UI pixel is then one game pixel: pixel-art UI lines up with the scene, and text stays sharp. UI Pixel Size 2 draws it twice as large, still on the grid. It replaces the Canvas Scaler on the same object.
- Screen Space Camera and World Space canvases render inside the retro picture — pixelated and palettised. Doctor points them out.
- Fonts: three CC0 pixel fonts by Kenney are in
Pixel Eras/Fonts/.
Retro Studio
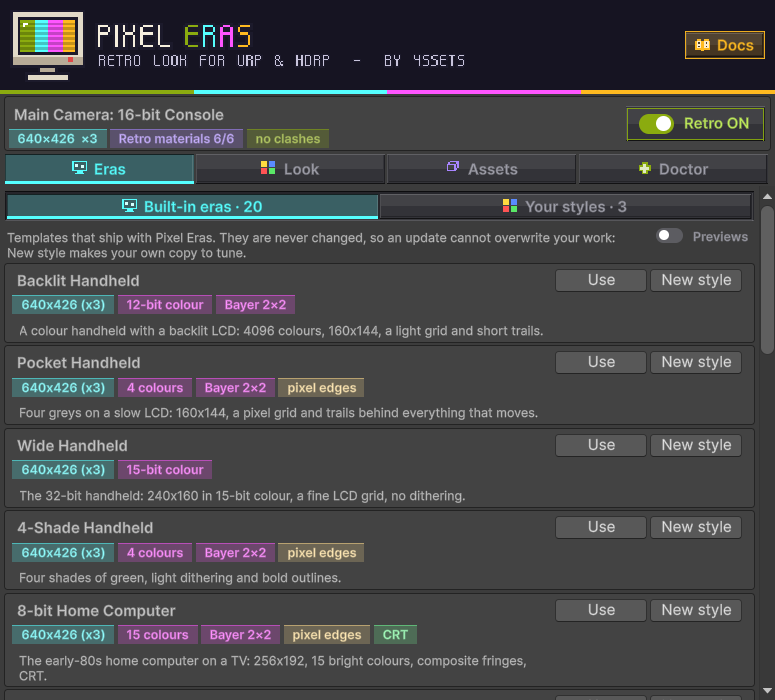
Window → 4ssets → Retro Studio (also Tools → Pixel Eras → Retro Studio). The header shows the camera the window acts on (the selected one, else the Main Camera), its game picture, and a Retro ON / OFF switch for before-and-after comparison. Without a Pixel Eras Camera in the scene it shows Make it Retro instead.
Eras
Two lists, one at a time: Built-in eras, the templates that ship with Pixel Eras and are never changed, and Your styles, the ones you made from them. The tab of each list shows how many it holds; the window opens on Your styles when you have any, and a new style is listed there. Each card shows the era's preview, resolution on the current view, colours, dither and CRT/VHS. Use puts it on the camera; Edit (your styles) opens it in the Look tab, Delete moves it to the system trash; New style (built-in eras) makes your own copy, named and described by you — see Your own styles. Apply to Retro materials applies the era's vertex snap, affine and filter suggestions to the scene's Retro materials. Previews, beside the two lists, hides the era pictures: each card shrinks to its name, facts and description with small buttons in one row, so the whole list fits a short window. The window remembers the choice.
Look
Every setting of the picture in one place, in foldable sections, with Undo, showing in the Game view as you change it: Picture, Motion, Distance, Colour, Pixel Edges, CRT, VHS, Geometry. A style's look is drawn without Volume override toggles: a style sets every value.
- Picture — the camera: target height (the era's, when it sets one), scaling, border, sampling, projection, Smooth Pixel Camera and Focus Distance, View Frame Rate, Draw Distance.
- Look — the era's Pixel Eras Look: saturation, contrast, palette, colour depth, dithering, Pixel Edges, CRT and VHS. With no era on the camera, the scene's Volume that holds a Pixel Eras Look is edited instead.
- Shapes — the era's vertex snap, affine mapping and texture filter, applied to the scene's Retro materials as they change, and Light Bands for every Retro Lit material.
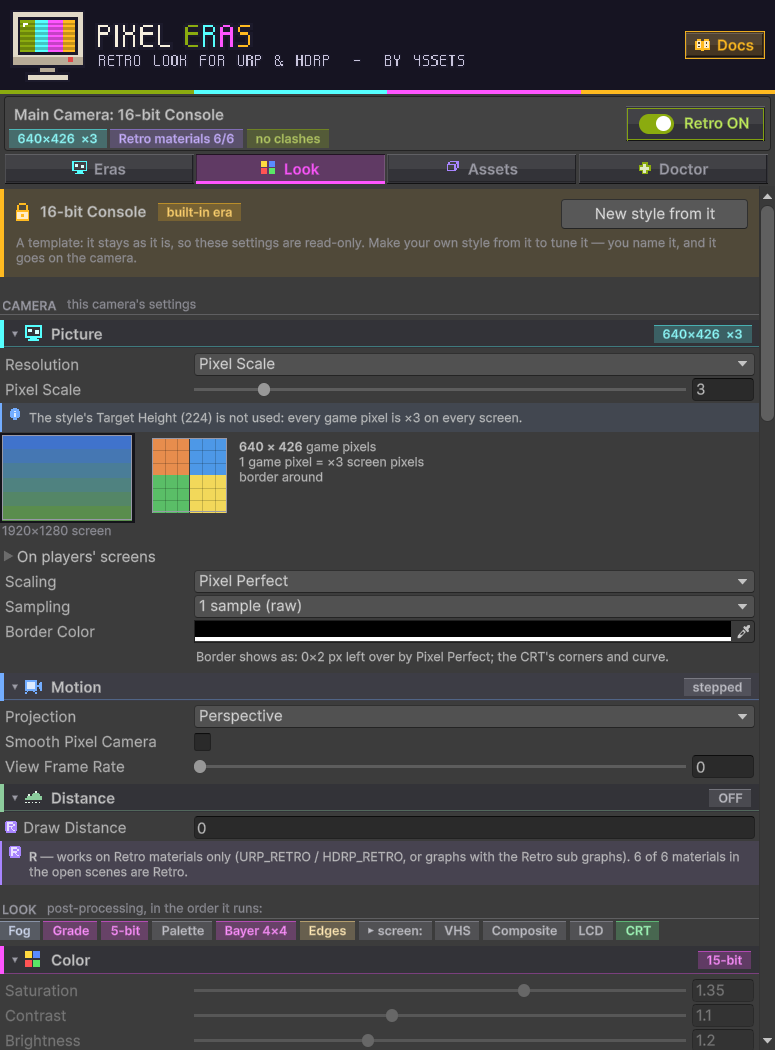
For your own style the tab starts with its name, short and full description, Default for new scenes and Capture preview. A built-in era is read-only here: the tab starts with New style from it instead.
Assets
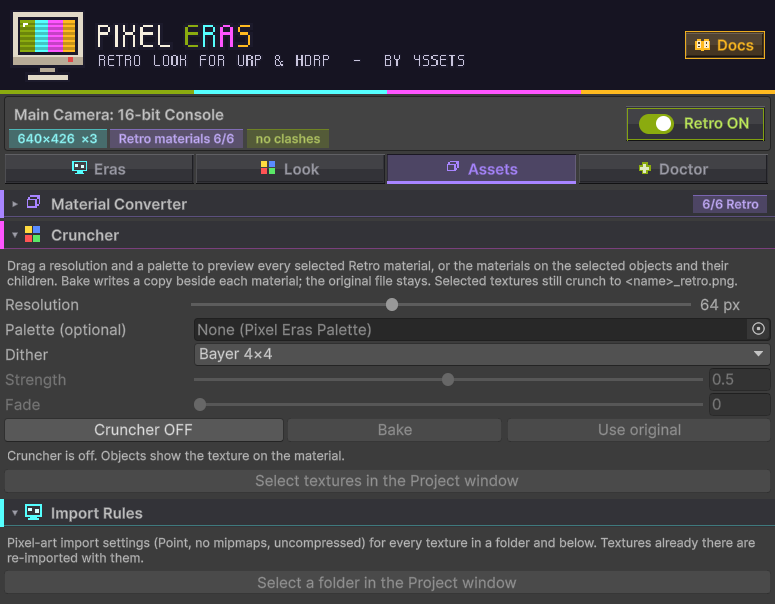
- Material Converter turns the scene's (or the selected) materials into Retro ones — see Converting materials.
- Cruncher previews one resolution (16–512) and an optional palette on every selected
Retro Lit or Unlit material. Select the materials in the Project window, or select objects in
the Hierarchy: Cruncher takes the materials on their Mesh and Skinned Mesh renderers, including
children. The list shows each material, even when there is only one. With more than one, the
slider edits all of them; to edit a single material, select only that material in the Project
window. Resolution runs from 16 to 512. Dither is None, Bayer 2×2, 4×4 or 8×8, Blue Noise, or
Custom Texture with a pattern texture, with Strength and Fade as on
a Pixel Eras Look. Cruncher ON / OFF shows or hides
that preview; objects then draw the texture on the material. Bake and Use original
turn it off until a setting changes or you turn it on. The preview stays only while Retro Studio
is focused on the Assets tab with Cruncher ON; the Scene view shows a bar while that preview is up.
Objects that use a listed material update in the scene while it is on; the original texture and the
material slot stay as they are until Bake. Bake writes
<material>_crunch.pngbeside each material, assigns it, and remembers the original. The next experiment reads that original again and overwrites the same baked file. Use original puts the original back on every material that is showing its bake. With no baked file, the material shows the original. Selected textures still crunch to<name>_retro.pngbeside the source. A sprite sheet's copy keeps Sprite Mode Multiple but not the slices: slice it again in the Sprite Editor. Terrain and Retro Sprite are not previewed: terrain paints with layers, and a sprite draws its Sprite asset. - Import Rules: select a folder and press Add rules. Every texture in it and
below then imports with Point filtering, no mipmaps and no compression. The rules live in the
PixelErasTextureRulesasset (filter, mipmaps, compression, max size, pixels per unit), and existing textures are re-imported.
Doctor
Doctor checks the project and scene, explains each finding, and offers a one-click, undoable fix where it can. Fix all applies every fix for errors and warnings as one Undo step. Errors stop the look from drawing, warnings spoil it, and notes are worth knowing. The checks:
- missing renderer feature or lost shaders (URP); shaders missing from Always Included Shaders, Dynamic Resolution (HDRP);
- an era without a profile or without an active Pixel Eras Look; other overrides in an era profile;
- MSAA, camera anti-aliasing (FXAA/SMAA/TAA), URP dithering;
- a Pixel Perfect Camera on the same camera; a Pixel Eras Camera on an Overlay camera;
- a Pixel Eras Look in the pipeline's default Volume Profile;
- HDR display output;
- cameras that do not cover the screen or render to a texture;
- Pixel Edges on the 2D Renderer; View Frame Rate on a camera stack;
- sprites scaled by non-whole factors; alpha-clipped materials; canvases inside the retro picture.
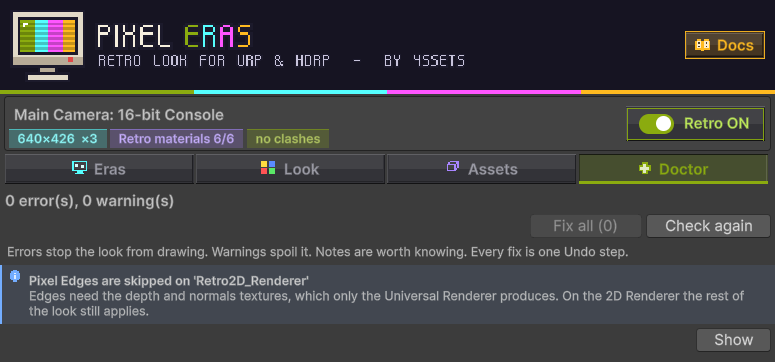
Doctor's errors are also printed to the console before every player build. A build cannot silently ship without the renderer feature or its shaders. Doctor never touches your post-processing: effects are yours to use on top of the look.
Scripting API
Namespace FourSsets.PixelEras.
using FourSsets.PixelEras;
using UnityEngine;

public class EraSwitcher : MonoBehaviour
{
    public PixelErasCamera retro;
    public PixelEra flashback;

    void Update()
    {
        if (Input.GetKeyDown(KeyCode.F))
            retro.TransitionTo(flashback, 1.5f); // crossfade over 1.5 s of unscaled time

        // The game pixel under the mouse, e.g. for a pixel-snapped cursor.
        Vector2 pixel = retro.ScreenToVirtualPixel(Input.mousePosition);
        Vector2Int cell = Vector2Int.FloorToInt(pixel);
    }
}
Every type below is public and documented in the code. Settings that are plain fields are listed with their C# names in the Parameter reference.
PixelErasCamera
| Member | Description |
|---|---|
static PixelErasCamera Main | The camera whose era lights and stepping follow: the main camera's Pixel Eras Camera, else the first enabled one. null when Pixel Eras is off. |
PixelEra Era | The era shown. Setting it switches at once and cancels a transition. null = look from Volumes. |
TransitionTo(era, seconds) | Crossfades over unscaled time, in Play Mode (in Edit Mode it switches at once). Numbers blend; palette, switches, patterns and resolution change halfway. Works from no era too (the Volumes' look). |
bool IsInDrawDistance(position), IsInDrawDistance(transform) | Whether a point is inside Draw Distance: no deeper in view than where Retro materials drop polygons. True with Draw Distance 0 or the component off. Use it to show or hide what the draw distance does not reach — world-space UI, particles, sounds: bar.SetActive(PixelErasCamera.Main.IsInDrawDistance(boss.transform)). The demo hides its bosses' health bars this way. |
bool IsTransitioning | Whether a transition is running. |
int EffectiveTargetHeight | The era's height, or Target Height (used in Target Height mode). |
resolutionMode, pixelScale | Target Height, Pixel Scale or Fixed Resolution, and the scale for Pixel Scale. Settable at runtime, for example from a settings menu. |
PixelErasResolution Resolution | Game buffer width, height and scale this frame. |
ScreenToVirtualPixel(screen) | Screen position (bottom-left origin) → game pixels, on the grid as it is drawn — including the Smooth Pixel Camera's sub-pixel shift, so a cursor snapped to it lands on the pixels on screen. Camera.ScreenPointToRay and the rest need no conversion. |
VirtualPixelToScreen(pixel) | The inverse. |
| Inspector fields | targetHeight, scaling, borderColor, sampling, smoothPixelCamera, focusDistance, drawDistance, viewFrameRate — change them at any time. |
enabled | Off: the plain picture, and every Pixel Eras Light, fog, halo, Animation and Stepped Motion goes plain with it. |
Era or calling TransitionTo changes the look only.
A style of your own may also carry picture settings (scaling, sampling, Smooth Pixel Camera…);
to put those on the camera too, call era.GivePicture(retro).PixelEra (era or style asset)
| Member | Description |
|---|---|
PixelErasLook Look | The look inside the era's profile, or null. |
VolumeProfile profile | The profile holding the look; only its Pixel Eras Look is read. |
string displayName, summary, description, Summary | Name and texts shown in Retro Studio; Summary falls back to the description. |
GivePicture(camera) | Puts the style's picture settings on a camera, when it carries them (hasPicture). |
TakePicture(camera) | Stores a camera's picture settings in the style. |
| Other fields | Height, material suggestions, lighting and animation rate: see Era / style. |
PixelErasLook and changing a look at runtime
PixelErasLook is a VolumeComponent: every setting is a
VolumeParameter (look.ditherStrength.value to read,
look.ditherStrength.Override(0.3f) to write). IsActive(),
UberActive, FogActive, EdgesActive, CrtActive,
VhsActive, CompositeActive, LcdActive say which stages run.
// using UnityEngine.Rendering;
// A copy of the era with its own copy of the look: change it freely, the asset never changes.
static PixelEra CopyOf(PixelEra source)
{
    var era = Object.Instantiate(source);
    era.profile = ScriptableObject.CreateInstance<VolumeProfile>();
    if (source.Look != null)
        era.profile.components.Add(Object.Instantiate(source.Look));
    return era;
}

// Usage: a VHS tear for half a second.
var hit = CopyOf(retro.Era);
hit.Look.vhs.Override(true);
hit.Look.vhsTracking.Override(1f);
var before = retro.Era;
retro.Era = hit;
// ...0.5 s later:
retro.Era = before;
Destroy copies you no longer need (the profile's components, the profile, then the era).
PixelErasStep — the step clock
One clock for everything that moves in steps: Pixel Eras Animation, Pixel Eras Stepped Motion and your scripts. It counts game time, so everything at the same rate steps on the same frame, and time scale 0 holds every step.
| Member | Description |
|---|---|
static int FrameRate | The era's step rate (its Animation frame rate on the main Pixel Eras Camera). 0 = smooth, or Pixel Eras off. |
static bool IsStepFrame | Whether this frame is a step at the era's rate. Always true when smooth. |
static float DeltaTime | On a step, the time it covers (whole steps since the last one); 0 between steps; Time.deltaTime when smooth. |
static float Time | Game time held at the last step. |
static event Action Stepped | Raised at the start of every step frame, before physics and Update. |
IsStep(rate), StepDeltaTime(rate), SteppedTime(rate) | The same for a rate of your own. |
// A sprite-like enemy that moves only on the era's steps.
void Update()
{
    if (PixelErasStep.IsStepFrame)
        transform.position += velocity * PixelErasStep.DeltaTime;
}
PixelErasAnimation and PixelErasSteppedMotion
| Member | Description |
|---|---|
int EffectiveFrameRate | The rate in use: the era's or the component's own; 0 when smooth or Pixel Eras is off. |
Refresh() | Animation: finds the Animators again (a model added at runtime). Stepped Motion: shows the object where it truly is at once (after a teleport) and finds its children and its Ignore list again. |
List<IgnoredObject> ignore, new IgnoredObject(target, recursive) | Stepped Motion: the objects left smooth. motion.ignore.Add(new PixelErasSteppedMotion.IgnoredObject(healthBar, recursive: true)); motion.Refresh(); |
| Fields | Animation and Stepped Motion settings; change them at any time. |
PixelErasLight
| Member | Description |
|---|---|
static PixelEra Era | The era lights follow: the main Pixel Eras Camera's. |
static bool RetroOn | Whether Pixel Eras is on (a Pixel Eras Camera is enabled). Off, every light is plain. |
Light Light | The Light it drives. |
string Steps | The pattern in use, one letter per step. |
float LevelAt(time) | The pattern's brightness at a time, against the light's own (1 = unchanged) — to flicker a sprite or a sound with the lamp. |
static float Level(char) | One letter's brightness: a = 0, m = 1, z ≈ 2.1. |
EffectiveShadows, EffectivePaletteColour, EffectiveHalo, EffectiveHaloDither | What the light uses now: the era's say or its own. |
static Color IntoPalette(colour, era) | A colour moved into an era's palette (or colour depth), brightness kept. |
const float StepsPerSecond | 10: pattern steps per second at Speed 1. |
PixelErasPalette
| Member | Description |
|---|---|
Color[] colors, int Count | The colours, sRGB, as authored. Change them with SetColors: setting an element of the array directly does not rebuild the palette's lookup. |
SetColors(Color[]) | Replaces the colours; the lookup is rebuilt on next use. For runtime palettes and tools. |
Texture3D GetLut(), const int LutSize | The 32³ nearest-colour lookup the look uses, for your own shaders. |
PixelErasResolution
A read-only struct: the game picture for a screen. Width, Height (game
pixels), Factor (whole scale), Scale (exact scale), Multiple
(samples per game pixel), Crop, Exact, IsWhole,
MaxScale (10). The static Compute, ComputeScale,
ComputeCrop, ComputeFill and ComputeFixed work out what a screen
size would get in each mode — for a settings menu that lists the choices.
Enums
PixelErasResolutionMode— TargetHeight, PixelScale, FixedResolution.PixelErasScaling— PixelPerfectFill, PixelPerfect, SharpFill.PixelErasSampling— Single, Supersample2x.DitherPattern— None, Bayer2x2, Bayer4x4, Bayer8x8, BlueNoise, CustomTexture.EdgePosition— Inside, Outside.CrtMask— ApertureGrille, ShadowMask, SlotMask.PixelErasFogMode— Linear, Exponential, ExponentialSquared.RetroTextureFilter— Point, Bilinear, ThreePoint.PixelErasLightShadows— Unchanged, Off, Pixel, Soft.PixelErasLightPattern— Steady, Flicker, Candle, Torch, Fluorescent, Pulse, Strobe, Custom.
Parameter reference
Every setting of every Pixel Eras component and asset, as the inspectors name it, with its C# field for scripts, its default and its range. The descriptions are the inspectors' tooltips.
Pixel Eras Camera
Component on a camera. The era itself is the Era property (see Scripting API).
| Setting | C# field | Default | Range | Description |
|---|---|---|---|---|
| Resolution | resolution | Target Height | Target Height, Pixel Scale, Fixed Resolution | Target Height: the style sets how many game pixels tall the picture is (or the camera's Target Height without one), and the whole-number scale that comes closest is used — about as many pixels on any screen, no border. Pixel Scale: every game pixel is a fixed number of screen pixels on every screen, whatever the style says. Fixed Resolution: exactly the target height on every screen, so every player sees the same picture; the largest whole-number scale that fits, with a border around the rest (Sharp Fill stretches it instead). |
| Target Height | target | 180 | ≥ 16 | Height of the game picture in game pixels, when no era sets one. Snapped to the nearest height that divides the screen evenly, so every game pixel is the same size. |
| Pixel Scale | pixelScale | 3 | 1 – 16 | Pixel Scale mode: screen pixels per game pixel, on every screen. ×3 on 1920×1080 is a 640×360 picture, on 2560×1440 853×480. |
| Scaling | scaling | Pixel Perfect Fill | Pixel Perfect Fill, Pixel Perfect, Sharp Fill | Pixel Perfect: whole-number scale, every game pixel the same size, a border fills the leftover screen pixels. Pixel Perfect Fill: the same, filling the screen: the leftover fraction of a pixel is cropped off the edges. Sharp Fill: exactly the target height at a fractional scale. Below about x3 the blend between blocks stays a third of a pixel, so the blocks do not blur. Fine dither patterns can still stripe below x3. |
| Border Color | borderColor | black | colour | Fills the few screen pixels left over when the screen size is not an exact multiple of the game picture. |
| Sampling | sampling | 1 sample | 1 sample (raw), 2×2 samples (smooth) | 1 sample: each game pixel is one sample of the scene — cheapest, but thin objects shimmer as the camera moves. 2×2 samples: the scene renders at twice the game resolution and each game pixel averages a 2×2 block, before the palette and dithering — clean edges and steady thin objects, for four times the pixels of the game picture (still far fewer than the screen). Not used in URP Compatibility Mode. |
| Smooth Pixel Camera | smooth | off | on / off | The camera glides instead of stepping a whole game pixel at a time, while still scenery stays stable. Orthographic: fully. Perspective: turning fully; moving holds scenery at the Focus Distance still, nearer and farther scenery shimmers a little. Adds a frame one game pixel wide around the picture. |
| Focus Distance | focus | 0 | ≥ 0 | Perspective Smooth Pixel Camera: the view depth held perfectly still while the camera moves. 0 = Auto: the distance to whatever is at the centre of the view (anything with a collider, such as the player or the ground), kept steady. |
| Draw Distance | draw | 0 | ≥ 0 | Polygons farther than this (in view depth) pop out whole, as on 32-bit consoles, instead of being cut by the far plane. Pair it with fog. Applies to Retro Lit, Retro Unlit and Shader Graphs using the Retro Vertex Snap sub graph; Pixel Eras Lights past it go out (in Play Mode) and their halos drop. For anything else, such as world-space UI, ask IsInDrawDistance. 0 = off. |
| View Frame Rate | view | 0 | 0 – 60 | Plays the view at this many frames per second while the game runs at full rate — the stepped look of stop-motion and of old consoles that could not keep up. Held frames skip drawing the scene, so they cost almost nothing; UI, CRT and VHS stay at full rate. A skinned mesh that keeps moving between shown frames must update while off screen, or its pose falls behind a rigid weapon. 0 = every frame. Play Mode only. |
Pixel Eras Look
Volume override, and the look inside every era. Each field is a VolumeParameter: read .value, write with .Override(value).
| Setting | C# field | Default | Range | Description |
|---|---|---|---|---|
| Saturation | saturation | 1 | 0 – 2 | Colour intensity before the palette and colour depth. Above 1 gives the vivid colours of old games; below 1 mutes them. 1 = unchanged. |
| Contrast | contrast | 1 | 0.5 – 2 | Contrast before the palette and colour depth, around mid-grey. Above 1 separates flat, mid-toned scenes into clearer light and dark, so a small palette keeps them readable. 1 = unchanged. |
| Brightness | brightness | 1 | 0.5 – 2.5 | Lifts the darks and mid-tones before the palette and colour depth, keeping black and white where they are. Above 1 keeps a dark or night scene from sinking into the palette's darkest colour; below 1 deepens the shadows. 1 = unchanged. |
| Palette | palette | none | Pixel Eras Palette | Reduce the picture to these colours. Empty: keep every colour. |
| Color Bits | colorBits | 8 | 1 – 8 | Bits per colour channel. 8 keeps full colour; 5 gives the 15-bit look of 32-bit era consoles. |
| Dither Pattern | dither | Bayer 4×4 | None, Bayer 2×2, Bayer 4×4, Bayer 8×8, Blue Noise, Custom Texture | Pattern that blends neighbouring colours where the palette or colour depth would band. |
| Strength | dither | 0.5 | 0 – 1 | How much dithering blends neighbouring colours: 1 mixes fully between the two colours a pixel lies between, lower keeps colours near a palette colour flat and calm. |
| Threshold | dither | 0 | 0 – 1 | How much of an area the pattern must cover before it dithers. 0 dithers every in-between shade; higher keeps colours near a palette colour flat and dithers only the middle of each transition, the banded look of many old games. |
| Fade | ditherFade | 0 | 0 – 1 | Subdues the pattern without moving it: the pixels the dither flips to the other colour are drawn part-way back toward the flat colour, so the dots read fainter. 0 = full contrast, 1 = no visible pattern. Above 0 the flipped pixels leave the palette. |
| Pattern Texture | dither | none | texture | Custom Texture pattern: a threshold texture tiled once per game pixel, read from the red channel (darkest lights up first). Import it with sRGB off, Point filtering and no compression. |
| Stable Dither | stable | off | on / off | Keeps each pixel's colour choice while the same spot of surface stays inside it and its colour barely changes, so dithering and colour edges stay calm while the camera moves instead of sparkling. Moving objects still update at once. Reads the depth buffer; costs one small texture at the game's resolution. |
| Hold | stable | 0.15 | 0 – 1 | Stable Dither: a pixel keeps its colour while the same spot of surface stays inside it and that colour still lies within the colours of the pixels around it, give or take this share of one colour step. Higher keeps faint dither and colour edges calmer in flat areas; lower follows slowly changing light more closely. |
| Outline | edgeOutline | 0 | 0 – 1 | A line one game pixel wide at every silhouette, in its Color: how strongly. 0 = off. Needs the camera depth texture. |
| Position | edge | Inside | Inside, Outside | Inside: the outline darkens the object's own edge pixels. Outside: it is drawn around the object, on the pixels just beyond its silhouette, in a darker shade of the object's colour — the classic sprite outline; the object keeps all its pixels. |
| Color | edge | black | colour | The colour the outline goes to; Outline sets how far each line pixel goes toward it from the surface's own colour. Reduced to the palette with the rest of the picture. |
| Fade | edge | 0 | 0 – 1 | Makes the outline see-through: each outline pixel, once reduced to the palette, is mixed back toward the colour it would have without the outline. 0 = solid, 1 = gone. Above 0 the outline leaves the palette. |
| Highlight | edge | 0 | 0 – 1 | A light line one game pixel wide along every ridge (a convex fold of a surface, like a box's edges): how bright. Folds inward, where a wall meets the floor, stay dark. 0 = off. Needs camera depth and normals, which costs an extra geometry pass in URP. |
| Position | edge | Outside | Inside, Outside | Which side of the ridge the highlight lies on. Inside: on the face turned toward the camera. Outside: on the face turning away from it (a box's top seen from the front). |
| Color | edge | white, alpha 0 | colour with alpha | Tints the highlight; white keeps each surface's own colour, brightened. Alpha: how far the line takes the colour as it is, the same on every surface at 1. Reduced to the palette with the rest of the picture. |
| Fade | edge | 0 | 0 – 1 | Makes the highlight see-through: each highlight pixel, once reduced to the palette, is mixed back toward the colour it would have without the highlight. 0 = solid, 1 = gone. Above 0 the highlight leaves the palette. |
| Silhouette Threshold | edge | 0.05 | 0.01 – 1 | How large a depth step counts as a silhouette, relative to distance. Floor 0.01: at 0 every surface reads as an edge and the picture goes dark. |
| Crease Threshold | edge | 0.3 | 0.01 – 1 | How sharp a bend counts as a crease: 0.01 lights the faintest bend, 0.3 about 45 degrees, 1 only right angles (the sharpest a surface folds). |
| Through Transparent | edge | on | on / off | Whether the outline shows through transparent surfaces in front of it (glass, smoke, particles). Off: where a transparent surface covers it, the line fades out with how much the surface hides. Costs a copy of the picture at the game's resolution. |
| Through Transparent | edge | on | on / off | Whether the highlight shows through transparent surfaces in front of it (glass, smoke, particles). Off: where a transparent surface covers it, the line fades out with how much the surface hides. Costs a copy of the picture at the game's resolution. |
| CRT Screen | crt | off | on / off | Draws the picture as a CRT screen. Adds a full-resolution pass. |
| Curvature | crt | 0.2 | 0 – 1 | How much the screen bulges. 0 = flat. |
| Scanlines | crt | 0.6 | 0 – 1 | Visibility of the gaps between scanlines. The beam widens on bright areas, so the picture keeps its brightness. |
| Phosphor Mask | crtMask | Aperture Grille | Aperture Grille, Shadow Mask, Slot Mask | Phosphor pattern of the tube. |
| Mask Strength | crt | 0.3 | 0 – 1 | How strongly the phosphor pattern shows. Brightness is compensated. |
| Softness | crtSoftness | 0.3 | 0 – 1 | Horizontal smear of the beam along each line. |
| Glow | crtGlow | 0.15 | 0 – 1 | Light spilling inside the glass around bright areas. Computed at half the game resolution. |
| Corner Radius | crt | 0.05 | 0 – 0.5 | Rounding of the tube's corners. |
| Vignette | crtVignette | 0.3 | 0 – 1 | Darkening toward the edges of the tube, as the beam weakens there. 0 = off. |
| VHS Tape | vhs | off | on / off | Plays the picture back from a worn tape. Adds a full-resolution pass. |
| Jitter | vhsJitter | 0.4 | 0 – 3 | Sideways shake of each line, in game pixels. |
| Noise | vhsNoise | 0.4 | 0 – 1 | Tape grain. |
| Color Bleed | vhs | 0.6 | 0 – 1 | Colour trailing behind brightness, as on tape. |
| Tracking | vhsTracking | 0.3 | 0 – 1 | A band of torn, noisy lines rolling down the picture. |
| Composite Cable | composite | off | on / off | Shows the picture through a composite video cable: neighbouring pixels along each line run into each other, so dithered stripes melt into in-between colours and see-through effects, as 8- and 16-bit games were drawn for. Adds a full-resolution pass. |
| Blend | composite | 0.7 | 0 – 1 | How far brightness runs into the neighbouring pixels along the line. 1 melts one-pixel dither stripes completely. |
| Color Bleed | composite | 0.5 | 0 – 1 | How much further colour spreads than brightness: composite video carries colour at a fraction of the detail. |
| LCD Screen | lcd | off | on / off | Shows the picture on a handheld's LCD: a grid between the pixels and the slow response of early panels. Adds a full-resolution pass. |
| Pixel Grid | lcdGrid | 0.3 | 0 – 1 | Darkness of the gaps between the LCD's pixels. Drawn from x2 scale up. |
| Ghosting | lcdGhosting | 0.5 | 0 – 0.95 | How slowly the panel's pixels change: moving things leave a fading trail, as on early handhelds. Play Mode only. 0 = instant. |
| Retro Fog | fog | off | on / off | Retro fog over the scene by depth, before the palette: it lands on the era's colours and dithers with them. On every material; transparent Retro materials fog themselves. Adds one pass at the scene's resolution. |
| Mode | fogMode | Linear | Linear, Exponential, Exponential² | Linear: from Start to End, as 32- and 64-bit consoles did it. Exponential and Exponential²: thicker with distance by Density, starting at Start. |
| Color | fogColor | RGB 0.42, 0.44, 0.52 | colour | The fog's colour. Night scenes look best with a dark fog close to the sky's. |
| Start | fogStart | 8 | ≥ 0 | Distance where the fog begins, in world units. |
| End | fogEnd | 40 | ≥ 0 | Linear: distance where the fog is complete. |
| Density | fogDensity | 0.05 | 0 – 1 | Exponential modes: how thick the fog gets per unit of distance. |
| Opacity | fogOpacity | 1 | 0 – 1 | The most the fog covers: 1 hides everything at its end; lower keeps far things faintly visible. |
| Fog the Sky | fogSky | on | on / off | Whether the sky and the background are fogged too. Off keeps the sky as it is behind the fog. |
| Bands | fogBands | 0 | 0 – 8 | The fog in flat steps of thickness, as early 3D hardware drew it. 0 = smooth. |
| Band Dither | fogDither | 0.5 | 0 – 1 | Ordered dither across the step between two bands of fog, in game pixels: the stippled fog edge of the 32- and 64-bit era. 0 = hard steps. |
| Ground Fog | fogHeight | 0 | 0 – 1 | Fog lying on the ground: how thick it is at the bottom. 0 = none. |
| Top | fog | 1.2 | any height | World height of the ground fog's top. |
| Soft Depth | fog | 1.5 | ≥ 0.05 | How far below its top the ground fog is at full thickness, in world units: a soft top. |
| Drift | fogDrift | 0 | 0 – 1 | Drifting patches: the fog grows thicker and thinner in slow-moving clouds. 0 = even. |
| Patch Size | fog | 6 | ≥ 0.5 | Size of the drifting patches, in world units. |
| Speed | fog | 0.6 | 0 – 5 | How fast the patches drift, in world units per second. |
| Hide Draw Distance | fog | off | on / off | The fog closes in before the camera's Draw Distance, so polygons that drop out vanish inside it, as on 32- and 64-bit consoles. Needs a Draw Distance on the Pixel Eras Camera. |
Era / style (PixelEra asset)
Create → 4ssets → Pixel Eras → Era. Built-in eras are read-only in Retro Studio; your styles are edited in its Look tab.
| Setting | C# field | Default | Range | Description |
|---|---|---|---|---|
| Name | displayName | Custom Era | text | The name shown in Retro Studio and the camera's era list. |
| Short description | summary | — | text | One line about the look, shown on its card in Retro Studio. |
| Full description | description | — | text | The full description: what the look is, what it suits and what it costs. Shown in Retro Studio. |
| Target Height | target | 180 | 0 (the camera's own), or ≥ 16 | Height of the game picture in game pixels. 0 keeps the camera's own Target Height. |
| Profile | profile | — | Volume Profile | The look. Only its Pixel Eras Look override is read; other overrides in this profile are ignored, so keep your post-processing in your own Volumes. |
| Carries picture settings | hasPicture | off | on / off | Whether the style carries the camera picture settings below. Your styles do; built-in eras do not, so they leave the camera's own settings alone. |
| Resolution | resolution | Target Height | Target Height, Pixel Scale, Fixed Resolution | Picture setting a style puts on the camera: how the game picture is sized. See the camera's Resolution. |
| Pixel Scale | pixelScale | 3 | 1 – 16 | Picture setting: screen pixels per game pixel in Pixel Scale mode. |
| Scaling | scaling | Pixel Perfect Fill | Pixel Perfect Fill, Pixel Perfect, Sharp Fill | Picture setting: the camera's Scaling. |
| Sampling | sampling | 1 sample | 1 sample (raw), 2×2 samples (smooth) | Picture setting: the camera's Sampling. |
| Smooth Pixel Camera | smooth | off | on / off | Picture setting: the camera's Smooth Pixel Camera. |
| Focus Distance | focus | 0 | ≥ 0 | Picture setting: the camera's Focus Distance (0 = Auto). |
| View Frame Rate | view | 0 | 0 – 60 | Picture setting: the camera's View Frame Rate (0 = every frame). |
| Draw Distance | draw | 0 | ≥ 0 | Picture setting: the camera's Draw Distance (0 = off). |
| Vertex Snap | vertexSnap | 0 | 0 – 1 | Retro materials: vertices snap to the game's pixel grid, the wobble of 32-bit consoles. 0 = off. Set on the scene's Retro materials by Retro Studio. |
| Affine Mapping | affine | 0 | 0 – 1 | Retro materials: textures warp across large polygons, as on hardware without perspective correction. 0 = off. |
| Texture Filter | texture | Point | Point, Bilinear, Three Point (N64) | Retro materials: Point keeps texels crisp, Bilinear smooths them, Three Point is the N64's three-sample blend. |
| Lighting › Shadows | light | As Set | As Set, Off, Pixel (hard), Soft | Pixel Eras Lights that follow the era: their shadows. Off for eras before real-time shadows, Pixel for hard-edged ones, As Set keeps each light's own. A light without shadows never gets them. |
| Lighting › Palette Colour | light | off | on / off | Pixel Eras Lights that follow the era: their colour moved into the era's palette (or colour depth), brightness kept, so lit surfaces stay in the era's colours. |
| Lighting › Halos | light | on | on / off | Pixel Eras Lights that follow the era: a pixel halo on point and spot lights, a disc in the sky on a directional light. Off hides every such halo; each light keeps its own Halo, Size and Strength. |
| Lighting › Halo Dither | light | 1 | 0 – 1 | Pixel Eras Lights that follow the era: dither of their halo. 0 is a smooth glow, 1 is the full ordered dither. |
| Lighting › Light Rings | lightRings | 0 | 0 – 8 | Retro materials: point and spot lights fall off in this many flat rings across their range, as on early 3D hardware. 0 = smooth. |
| Lighting › Ring Dither | light | 0.5 | 0 – 1 | Retro materials: ordered dither across the step between two rings, as a share of a ring. 0 = hard edges. |
| Animation › Frame Rate | animation | 0 | 0 – 60 | The era's step rate: Pixel Eras Animation moves Animators, and Pixel Eras Stepped Motion moves objects, this many steps a second, as sprites and early 3D characters did. 0 = smooth. |
Pixel Eras Light
Component on a Light.
| Setting | C# field | Default | Range | Description |
|---|---|---|---|---|
| Pattern | pattern | Steady | Steady, Flicker, Candle, Torch, Fluorescent, Pulse, Strobe, Custom | How the brightness changes: in steps, ten a second at speed 1, as lights in old games did. Plays in Play Mode. |
| Custom Pattern | custom | mmmaammmmmmmmmamm | text | Custom pattern: one letter a step. a = dark, m = the light's own intensity, z = a little over double. |
| Speed | pattern | 1 | 0.1 – 4 | Pattern steps per second, as a multiple of ten. |
| Shadows From Era | shadows | on | on / off | Shadows as the era has them (Off before real-time shadows, Pixel for hard-edged ones). A light without shadows never gets them. |
| Shadows | shadows | As Set | As Set, Off, Pixel (hard), Soft | This light's shadows, when not following the era. |
| Palette Colour From Era | palette | on | on / off | Colour as the era has it: moved into its palette when the era does that. |
| Palette Colour | palette | off | on / off | This light's colour moved into the era's palette (or colour depth), brightness kept, when not following the era. |
| Halo From Era | halo | on | on / off | Halo as the era has it: a pixel halo when the era draws one. |
| Halo | halo | off | on / off | A pixel halo round the light, when not following the era: a glow drawn in the scene, pixelated and dithered with the game picture. On a directional light it is a disc in the sky towards the light (a sun or a moon). |
| Halo › Size | haloSize | 1.2 | ≥ 0.05 | Width of the halo, in world units. |
| Halo › Strength | halo | 1 | 0 – 4 | Brightness of the halo against the light's colour. |
| Halo Dither From Era | halo | on | on / off | Dither of the halo as the era has it. 0 is a smooth glow, 1 is the full ordered dither. |
| Halo › Dither | halo | 1 | 0 – 1 | Dither of this light's halo, when not following the era. 0 is a smooth glow. 1 is the full ordered dither, four flat steps. |
Pixel Eras Animation
Component on a character's root.
| Setting | C# field | Default | Range | Description |
|---|---|---|---|---|
| Frame Rate From Era | frame | on | on / off | Frames per second as the era has them. Untick to set the rate here. |
| Frame Rate | frameRate | 12 | 0 – 60 | Animation frames per second when not following the era. 0 = smooth. |
| Include Children | include | on | on / off | Step the Animators on child objects too (a character's model under its root). |
| Step Scripted Pose | step | on | on / off | Bones that scripts move after the Animator (IK, aiming, turning the hips in LateUpdate) move in whole frames too: the finished pose of each step is held until the next. Off: only the Animator steps and scripts move the bones every frame. |
Pixel Eras Stepped Motion
Component on anything that moves, or on a root holding Particle Systems.
| Setting | C# field | Default | Range | Description |
|---|---|---|---|---|
| Frame Rate From Era | frame | on | on / off | Steps per second as the era has them (its Animation frame rate), shared with Pixel Eras Animation. Untick to set the rate here. |
| Frame Rate | frameRate | 12 | 0 – 60 | Steps per second when not following the era. 0 = smooth. |
| Hold Position | hold | on | on / off | The position moves in steps. |
| Hold Rotation | hold | on | on / off | The rotation turns in steps. |
| Hold Scale | holdScale | on | on / off | The scale grows and shrinks in steps. |
| Include Children | include | off | on / off | Objects below this one step too (a propeller, a swinging sign), each in its own local space. Skipped: an Animator's bones (Pixel Eras Animation steps those) and objects with their own Stepped Motion. |
| Ignore | ignore | empty | objects below, each with Recursive | Objects below this one that keep moving smoothly in the world, even while the objects above them step: a health bar over a stepped enemy, its UI, a light or a trail. Recursive leaves everything below an entry smooth too; without it the entry's children still step, in the entry's own space. Their Particle Systems run smoothly as well. Not below an Animator's bones or another Stepped Motion. Call Refresh() after changing the list at runtime. |
| Snap To Pixels | snap | off | on / off | The object sits on whole game pixels of the main Pixel Eras Camera: it moves pixel by pixel across the screen, as sprites did, instead of sliding between them. Also at a rate of 0 (smooth), while Pixel Eras is on. |
| Step Particles | step | on | on / off | Particle Systems on this object and anywhere below it simulate in steps too: each step they move on by the step's time, between steps they hold still. Play, Stop, Emit, bursts and sub-emitters work as before; systems added later are found by themselves. Their Simulation Speed is taken over (multiplied, not replaced). Systems below another Stepped Motion are its own. |
Palette (PixelErasPalette asset)
Create → 4ssets → Pixel Eras → Palette, or an imported .hex / .gpl / .pal file.
| Setting | C# field | Default | Range | Description |
|---|---|---|---|---|
| Colors | colors | black, white | list of colours | The palette colours, as authored (sRGB). |
Pixel Eras Canvas Scaler
Component on a Screen Space Overlay Canvas, in place of its Canvas Scaler.
| Setting | C# field | Default | Range | Description |
|---|---|---|---|---|
| Pixel Camera | pixelCamera | — | Pixel Eras Camera | The camera whose game pixels the UI matches. Empty: the Main Camera. |
| UI Pixel Size | uiPixelSize | 1 | ≥ 1 | Game pixels per UI pixel. 2 draws the UI twice as large, still on the game's pixel grid. |
Texture Import Rules
Asset made by Retro Studio → Assets → Import Rules (or Create → 4ssets → Pixel Eras → Texture Import Rules); applies to its folder and below. Editor only.
| Setting | C# field | Default | Range | Description |
|---|---|---|---|---|
| Filter Mode | filterMode | Point | Point, Bilinear, Trilinear | Point keeps every texel a sharp square. Bilinear or Three Point (in the material) soften it on purpose. |
| Mipmaps | mipmaps | off | on / off | Mipmaps blur textures in the distance — at retro resolutions that mostly turns them to mud. |
| Compression | compression | Uncompressed | Uncompressed, Compressed, Compressed HQ, Compressed LQ | Compression smears small, sharp-edged textures. Uncompressed keeps palettes exact. |
| Max Size | maxSize | 0 | 0 (keep), 32 – 8192 | Largest import size. 0 keeps the importer's own setting. |
| Pixels Per Unit | pixels | 0 | 0 (keep), or > 0 | Pixels per unit for sprites. 0 keeps the importer's own setting. |
Material properties (URP_RETRO and HDRP_RETRO)
For scripts that change Retro materials, for example material.SetFloat("_VertexSnap", 0.5f).
The same names in both families.
| Property | Shaders | Range | Description |
|---|---|---|---|
_BaseMap, _BaseColor | all | texture, colour | Albedo and colour (Terrain: tint). |
_Filter | all | 0 Point, 1 Bilinear, 2 Three Point | Texture filter. |
_Vertex | all | 0 / 1 | Multiply by vertex colours (and particle colour). |
_VertexSnap | all | 0 – 1 | Vertex snap to the game's pixel grid. |
_Affine | all | 0 – 1 | Affine texture mapping. |
_Affine | all | 0 – 40 | Distance under which the affine warp fades out. |
_LightSteps | Lit, Terrain | 0 – 8 | Light Bands; 0 = smooth. |
_ShadowTint | Lit, Terrain | colour | Colour of the unlit side. |
_Emission, _Emission | all | HDR colour, texture | Emission. |
_Surface, _Blend | Lit, Unlit | 0 Opaque, 1 Transparent; 0 Alpha, 1 Premultiply, 2 Additive, 3 Multiply | Surface Type and Blend Mode. Change them in the material inspector: it also sets the blend state and keywords, which changing the numbers from code does not. |
_AlphaClip, _Cutoff | Lit, Unlit (Terrain: holes) | 0 / 1; 0 – 1 | Alpha Clipping and its threshold. |
_Cull | Lit, Unlit | Unity's CullMode: 0 Off, 1 Front, 2 Back | Render Face, as the faces culled: 2 (Back) draws the front, 1 the back, 0 both. |
_Control, _Splat0–_Splat3 | Terrain | textures | Set by the Terrain from its layers. |
Performance
- URP: the scene renders at the game resolution, so with an era Pixel Eras usually costs less than rendering without it. HDRP renders the scene at full resolution: there the look adds its two passes.
- Uber (grade, palette, dither, edges) runs at the game resolution: a few hundred thousand pixels at most.
- CRT and VHS add one full-resolution pass; CRT glow works at half the game resolution.
- Edge Highlight needs URP's depth-normals prepass — an extra geometry pass. Edge Outline only needs depth. HDRP always has both.
- Retro Fog adds one pass at the scene's resolution (URP: the game resolution × Sampling; HDRP: the screen's). Edges hidden under transparent surfaces add one copy of the picture at that size.
- Light Rings light point and spot lights per pixel on Retro materials (per vertex without them): a light loop in the fragment shader, at the game resolution in URP. Halos are one small quad each.
- 2×2 Sampling renders four times the pixels of the game picture.
- View Frame Rate skips scene rendering on held frames.
- Pixel Eras Animation evaluates Animators on step frames only — cheaper than smooth animation. Stepped Motion writes a transform only when its step differs from the truth, and sets one speed per Particle System per frame.
- With the Pixel Eras Camera disabled nothing of Pixel Eras runs: passes are skipped, lights, animation and motion go plain.
Limitations
- XR (VR and AR) is not supported: a camera rendering to a headset draws without Pixel Eras, as if it had no Pixel Eras Camera.
- HDRP: Dynamic Resolution and upscalers (DLSS, FSR), MSAA with Pixel Edges or Stable Dither, and camera anti-aliasing are not supported (see HDRP).
- URP 2D Renderer: Pixel Edges and Stable Dither need depth and normals and are skipped; everything else works.
- URP Compatibility Mode (Unity 6.0–6.3): 2×2 Sampling is not used.
- GPUs without float render targets (some mobile and WebGL devices): Stable Dither needs a 32-bit float target and switches itself off there; LCD Ghosting falls back from 16-bit float to 8 bits, so its trail fades in coarser steps. Everything else is unchanged.
- Cameras: Pixel Eras is made for cameras that render to the whole screen; Doctor reports cameras that render into a Render Texture or to part of the screen. Several Pixel Eras Cameras each get their own look; lights and stepping follow the main camera's era.
- Retro materials only: vertex snap, affine mapping, texture filter, Light Bands, Light Rings and Draw Distance happen inside the surface shader (Retro materials). The rest of the look works on every material.
- URP_RETRO/Lit and URP_RETRO/Terrain light the main light per vertex with its shadow per pixel, and other lights per vertex (per pixel with Light Rings, and always under Forward+). They receive the main light's shadow only; light cookies, light layers, reflection probes, SSAO and LOD Cross-Fade are not read. Lightmaps and the ambient probe are.
- HDRP_RETRO reads directional, point and spot lights, the sun's shadow and the sky's ambient; area lights, cookies, light layers, lightmaps and light probes are not read.
- Terrain: four splat layers.
- Stepped Motion steps transforms and Particle Systems. Anything else that moves on its own — UI animation, scrolling or time-driven shaders, VFX Graph — is not stepped.
Troubleshooting
| Problem | Fix |
|---|---|
| Nothing changes | Open Retro Studio → Doctor. URP: usually the renderer feature is missing on the renderer of the current quality level. HDRP: Custom Passes are off in the camera's Frame Settings. |
| HDRP: the player build shows the plain scene | The Uber and Present shaders are not in Always Included Shaders. Press Make it Retro or Doctor's fix. |
| HDRP: Retro materials are far too bright or too dark | HDRP lights are physical (a sun is around 100 000 lux) and the picture follows the camera's exposure. Light the scene in HDRP's units and set Exposure in a Volume, as for HDRP Lit. |
| HDRP: Pixel Edges or Stable Dither do nothing | MSAA or Dynamic Resolution is on: neither works with these features. |
| Pixels shimmer as the camera moves | Turn on Smooth Pixel Camera. Orthographic cameras then hold every pixel still. With a perspective camera, set Focus Distance to the distance to the player and keep the view direction fixed while following. See Pixel stability. |
| Picture is blurry | Turn off MSAA and FXAA/SMAA/TAA (Doctor), and check Depth of Field and Motion Blur in your Volumes. Use Pixel Perfect or Sharp Fill, not a manual render scale. |
| A flat-coloured surface speckles between two colours in triangle-shaped patches as the camera moves | Its UVs sit exactly on the line between two texels of an atlas, and a plain Point sample picks one or the other pixel by pixel. Retro Lit and Retro Unlit nudge Point samples off that line; with other shaders, move the UVs to texel centres or use Bilinear / Three Point. |
| Lit areas show grainy speckle that crawls as the camera moves | Shadow acne: the directional light's shadow bias is too low, so surfaces shadow themselves in a fine pattern that is redrawn every time the shadow cascades move. A low resolution and Light Bands make it stand out. On the light, set Bias to Custom with Depth and Normal around 1 (or raise them in the URP asset). |
| Large areas are a noisy pattern | Lower Dither Strength, raise Contrast, or use Bayer 2×2. Mid-tones are where dithering shows most. |
| Dithering shows as stripes, or shimmers as the camera moves | Sharp Fill at a fractional scale under ×3 draws game pixels 1 or 2 screen pixels wide in turn; a fine pattern beats against that, and the smooth camera moves the beat every frame. Use Pixel Perfect Fill. |
| Colours look grey or flat | Raise Saturation (and Contrast) in the look. Retro palettes need colour to work with. |
| Look applies in every scene | A Pixel Eras Look sits in the pipeline's default Volume Profile. Move it to a scene Volume or use an era. |
| Volume changes do nothing | The camera has an era; an era replaces Volume looks. Clear the era. |
| Era profile changes do nothing | Only the Pixel Eras Look override in an era profile is read. Built-in eras are read-only in Retro Studio: make a New style from one first. |
| UI is pixelated | The canvas is Screen Space Camera or World Space. Use Screen Space Overlay, optionally with Pixel Eras Canvas Scaler. |
| Colours washed out on an HDR display | Turn off HDR output in Player Settings (Doctor). |
| Sprites look uneven | Scale sprites by whole numbers, keep Pixels Per Unit consistent, use Pixel Perfect scaling. |
| Pixel Perfect Camera conflicts | Remove URP's Pixel Perfect Camera; the Pixel Eras Camera replaces it. |
| Overlay camera is not retro | Put the Pixel Eras Camera on the Base camera of the stack, not on an overlay. |
| Compatibility Mode and nothing draws | Supported on Unity 6.0–6.3. Unity 6.4 and newer removed the mode; Pixel Eras uses Render Graph there. |
| Edges flicker on thin objects | Raise Silhouette Threshold (Outline) or Crease Threshold (Highlight), or use 2×2 Sampling. |
| Objects disappear at a distance | Draw Distance is on. Set it to 0 or raise it. |
| Era changes made in Play Mode stay after Play Mode | The era asset was changed. Change a copy instead (Changing a look at runtime). |
| A followed object jerks or slides on screen with a stepped camera | The camera and its target hold different things or step at different rates. Give both the same Hold Position / Rotation and rate, or use View Frame Rate (rules). |
| An object jumps back after a teleport | Call Refresh() on its Stepped Motion after moving it. |
| Animation is not stepped | The era's Animation Frame Rate is 0 (smooth), Pixel Eras is off, or the Animator is not under the Pixel Eras Animation (tick Include Children). |
| Particles still move smoothly | No Stepped Motion on them or above them, or its Step Particles is off. |
| Light Rings or Light Bands do nothing | They are drawn by Retro Lit and Retro Terrain materials only. Convert the materials. |
Demo
Open Assets/4ssets/PixelEras/Demo/Demo.unity and press Play: survive as long as
you can while the horde grows. The level is a walled graveyard on a moonlit night: a plaza and two avenues,
a grave field under green will-o'-the-wisps, a memorial garden with statues, a row of crypts in
purple light, the keeper's yard with its campfire and crates, and a mausoleum at the end of the
avenue; bats circle overhead. The zombies climb out of open graves and crypt doors. Cars, crates
and statues react to grenades; pumpkins burst, wooden fences splinter and hay bales scatter after
a few shots or a blast nearby — harmless, and whole again next round. You start with the
blaster, 13 rounds and a grenade. A zombie takes 3 to 5 hits; burning runners explode when they
reach you, green spitters keep their distance and throw poison, and now and then a boss with a
health bar arrives (a rarer mega boss is larger still). A grenade kills every regular zombie in
its blast — you too, if you stand too close. Ammo, grenades, food (heals and clears poison) and
shields (armour) lie around the graveyard; crates hold a shotgun or a rifle, and a second crate of
a gun you carry makes it stronger. Kills earn experience: each level makes the survivor a little
faster and dash more often. Press Esc to
pause and change the era, resolution and every setting of the look live. The demo shows each era
sharper than the era asset itself (360 or 270 pixels tall, ×3 or ×4 on 1080p), so every era reads
well at a glance; Picture → Pixels goes down to the era's own height. The survivor always faces
and fires where the camera looks; the mouse (or the right stick) turns both
(DemoCamera.lookSpeed). Picture → Projection switches between orthographic and
perspective to compare.
| Action | Keyboard | Gamepad |
|---|---|---|
| Move: forward, back, strafe (relative to the camera) | WASD / arrows | Left stick |
| Aim (turns the camera and the survivor) | Mouse | Right stick |
| Fire (hold) | Left click / F | RT |
| Throw a grenade | G / right click | LT |
| Blaster / shotgun / rifle | 1 2 3 / mouse wheel | X / LB / RB |
| Reload | R | — |
| Dash (not while backing off) | Space / Left Shift | A |
| Pause and settings | Esc / P | Start |
| Settings tabs | Q / E | LB / RB |
| Retro on/off compare | Tab | Y |
| Restart (after a round ends) | R / Enter | A |
| Show / hide the controls panel on the right | H | Select |
In a WebGL build the browser captures the mouse only on a click: the round waits on
CLICK TO PLAY until then, and that click does not fire. Esc (or switching tabs)
frees the mouse and pauses at once. Demo/Plugins/WebGL/PixelErasDemo.jslib asks the
page whether the mouse is captured.
The pause menu's tabs: PICTURE (resolution, scaling, sampling, Smooth Pixel Camera, projection, camera distance, View Frame Rate, Pixel Eras on/off), COLOR, EDGES, FOG, CRT, VHS, SCREEN (composite and LCD) — every setting of the look — GEOMETRY (the era's material settings, Light Bands and Draw Distance), LIGHT (rings, palette colour, halos) and FPS: the era's step rate, a rate for enemies, hero, camera, pickups and particles, and Snap to Pixels for everything at once.
Scripts worth reading: DemoMenu.cs and DemoSettings.cs (a settings menu
over the whole look, working on copies of the eras), DemoStepRates.cs (stepping rates per
kind of object). Demo/Scripts/DemoEffects.cs shows the look used as a game effect: the VHS tear
when a grenade goes off or the survivor is caught is a few lines that change the Pixel Eras Look at
runtime. Every effect — muzzle flash, tracers, sparks, hits, explosions — is square particles drawn
with Retro Unlit and short-lived point lights the vertex-lit scene reacts to.
The demo plays in URP and in HDRP. The scene carries no pipeline's components; in HDRP,
Demo/Scripts/Pipelines/HDRP gives it a fixed exposure, a sky and fog matching its
URP lighting, and turns HDRP's default post effects off, while the scene is open.
A build that includes the demo on Unity 6.6 or later logs one warning, “Pre-baked collision is disabled on … mesh(es) referenced by Mesh Collider components”: it concerns the demo's models only and changes nothing in the build.
Removing the demo: delete Assets/4ssets/PixelEras/Demo/. Nothing outside it
depends on the demo.
Removing Pixel Eras
- URP: remove the Pixel Eras feature from your renderer assets. HDRP: remove
Hidden/4ssets/PixelEras/Uberand…/Presentfrom Always Included Shaders. - Switch Retro materials back to your pipeline's Lit or Unlit shader: they use the package's shaders. Colour, texture and surface settings carry over, as the properties share their names.
- Remove the Pixel Eras components from your objects (Pixel Eras Camera, Light, Animation, Stepped Motion, Canvas Scaler) and the Pixel Eras Look overrides from your Volumes.
- Delete
Assets/4ssets/PixelEras/.
Support & license
Publisher: 4ssets, part of UnityCraft.org — unitycraft.org/4ssets.
Questions, bug reports and requests: through the publisher page above. Please include the Unity version, the render pipeline and its version, and Doctor's report (Retro Studio → Doctor).
Enjoying Pixel Eras? A short review on the Asset Store helps other developers find it and keeps updates coming. The same link is at the foot of Retro Studio (Rate; × hides the strip for good) and under Tools → Pixel Eras → Leave a Review.
Licensed under the Unity Asset Store EULA; see License.txt. Fonts, demo models and
demo sounds are CC0; see Third-Party Notices.txt. Version history:
Documentation/Changelog.txt.