Quick Start · Manual · API Reference
Keyline — Quick Start
An outline on screen in ten minutes. Everything else is in the Manual.
1 Import and open the demo
Import the package — it lands in Assets/4ssets/Keyline/ — and wait for the compile.
There is no renderer feature to add for a hard-edged outline, no volume to author and no layer to
reserve. Keyline Setup opens once after the compile: pick how much of Keyline the project
uses, or press Decide Later to keep everything. Two things are optional and it offers both —
a soft 3D rim, and per-outline see-through layers; later they are one tick each under
Project Settings ▸ Keyline ▸ Features.
Then open Assets/4ssets/Keyline/Demo/Demo.unity and press Play. Ten chapters, and
the fastest way to see what the asset does. Keys 1–0 switch chapters,
H hides the panel.
2 Your first outline
- Select any object with a renderer.
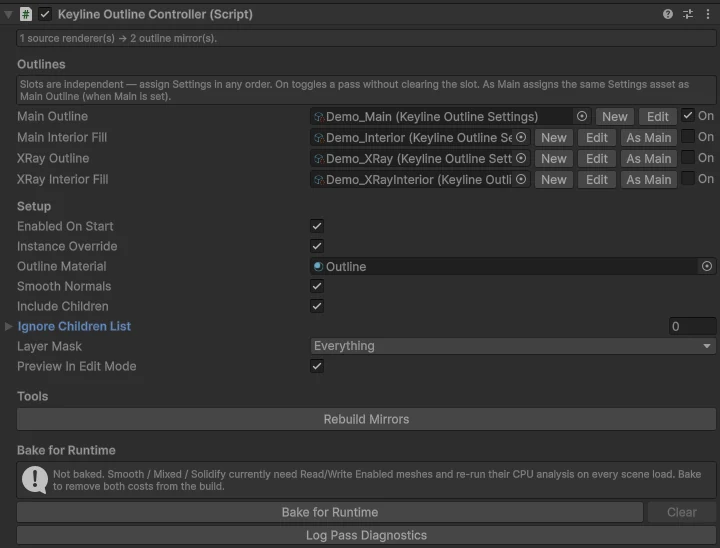
- Add Component ▸ Keyline ▸ Keyline Outline 3D.
- Press Add pass and choose Main Outline.
- Press New — or drag in one of the bundled profiles from
Runtime/Profiles/, one per style.
That is the whole setup. The object has an outline now.
3 The four passes
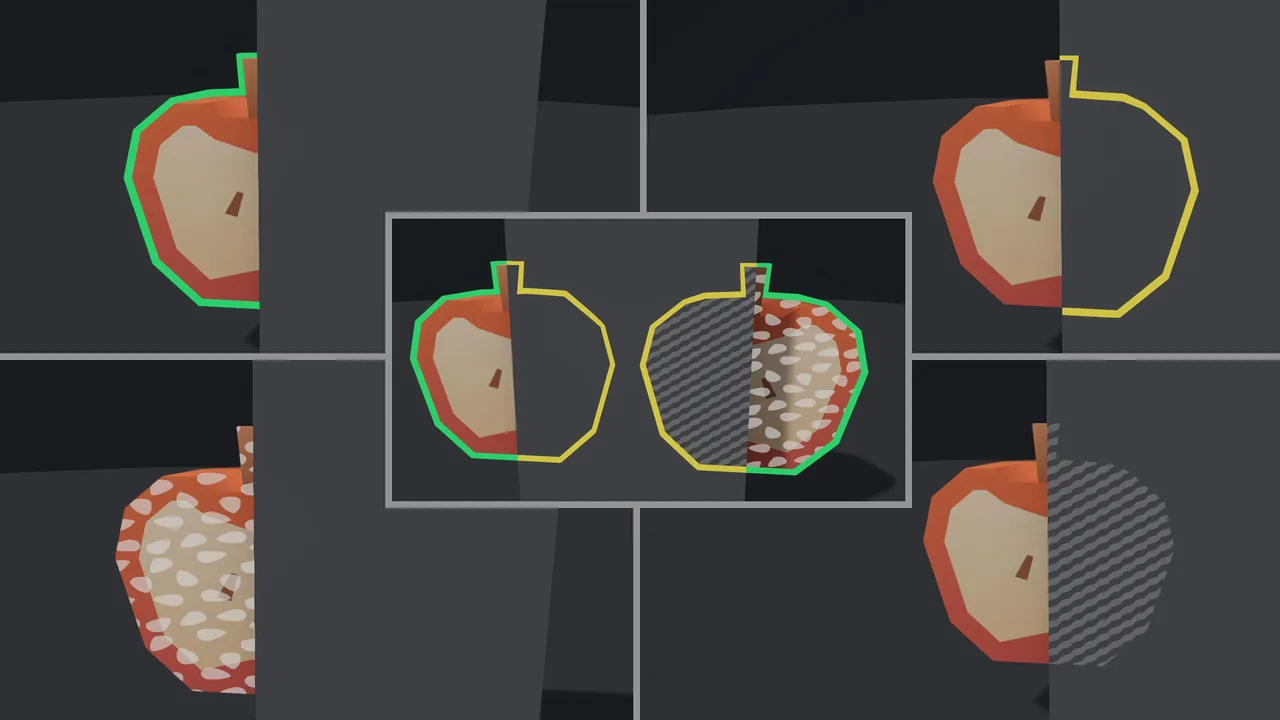
One component draws up to four things, each with its own switch and its own profile:
| Main Outline | the rim, where the object is visible — the ordinary outline |
| X-Ray Outline | the rim, only where the object is behind something |
| Main Fill | the object's own surface — damage flashes, gauges, dissolves |
| X-Ray Fill | the surface, only where the object is hidden |
A mesh has two more, off by default and experimental: a Cutout Overlay on the Main rim and one on the X-Ray rim, which draw that pass a second time so a hull silhouette and an alpha rim can share one object. The manual covers them; nothing here needs them.
4 A sprite instead of a mesh
A SpriteRenderer has its own component and the same everything else — the same
profiles, the same styles, the same four passes.
- Select the sprite. Add Component ▸ Keyline ▸ Keyline Outline 2D.
- Add a pass and give it a profile, exactly as above.
- Under Distance Field, press Generate Distance Field.
That last step is the one that has no equivalent on a mesh. A mesh outline is an inverted hull; a sprite has no hull to push, so its rim is measured against a distance field built from the artwork’s own alpha. It is baked once, next to the texture, and from then on the outline follows what is drawn — around a hole in the middle of the sprite as readily as around its edge.
5 Drive it from code
using FourSsets.Keyline;

var outline = target.GetComponent<KeylineOutline>();

outline.MainOutlineEnabled = true;      // switch the rim on
outline.Color = Color.red;              // recolour it
outline.Width = 0.04f;                  // metres, in World width mode
outline.XRayOutlineEnabled = true; // show it through walls toooutline.MainOutlineStyleProfile.color = red turns all hundred red — and in the editor the change
survives play mode. outline.Color = red forks the profile into a copy this object owns
before writing. That is on by default, and it is the one thing worth knowing on day one.Adding an outline at runtime is the same three lines, plus where to put them:
var outline = enemy.AddComponent<KeylineOutline>();

outline.Configure(main: hostileProfile, xray: seeThroughProfile);
Configure fills the slots in one go, which matters when you are spawning: assigning
them one at a time rebuilds the outline once per slot. Showing and hiding is free either way —
outline.OutlineEnabled = false takes it off screen without dismantling it, so a pooled
object that stays active comes back for nothing. The Manual's Scripting chapter has short recipes
for hover, selection, damage flashes, groups, pooling and more.
6 Fourteen components you do not have to write
Runtime/Recipes/ holds the arrangements people usually end up writing themselves:
hover, click selection, trigger and proximity highlights, damage flashes, gauges painted on the
model, impact and scan waves, materialising, squad highlighting, through-walls markers, blink,
fading with distance.
They are ordinary components written against the same public API you have — every member of it is in the searchable API Reference. Add Keyline ▸ Recipes ▸ Highlight (Arbiter) plus a collider to a prop, drop Keyline ▸ Recipes ▸ Pointer Highlight (Scene) anywhere in the scene, and hovering works — one raycast per frame for the whole scene, nothing registered, nothing wired.
Where to go next
- The Manual — every field of the component and the profile, the fifteen styles, hard meshes, cutout, sprites, merge groups, the recipes, scripting, what it costs, and a troubleshooting list written from real constraints rather than guesses.
- The API Reference — every public type and member of the scripting API, searchable by name or by what it does, with the manual's scripting chapter one click away.
- The demo scene — every chapter is a working example you can read the source of in
Demo/Scripts/. - Deleting the demo is expected. It is the largest folder in the package and nothing in
Runtime/references it. DeleteDemo/whole rather than in parts — itslink.xmland WebGL plugin belong to it and to nothing else.
Keyline is made by 4ssets, part of
UnityCraft.org. Questions, bugs and requests go to the
same address. Licence terms are in License.txt; the example art is by Kenney under
CC0, listed in Third-Party Notices.txt.